CAN测试(CAN test)
测试说明(test instruction)测试之前需要连接CAN的管脚,将CAN1的CAN_L和CAN2的CAN_L连接,将CAN1的CAN_H和CAN2的CAN_H连接。测试方法(test instruction) (1)点击“CAN”图标,启动测试程序(2)点解“Send”,发送数据,如果成功接收到数据,会在右边的文本框显示出来,如下图: 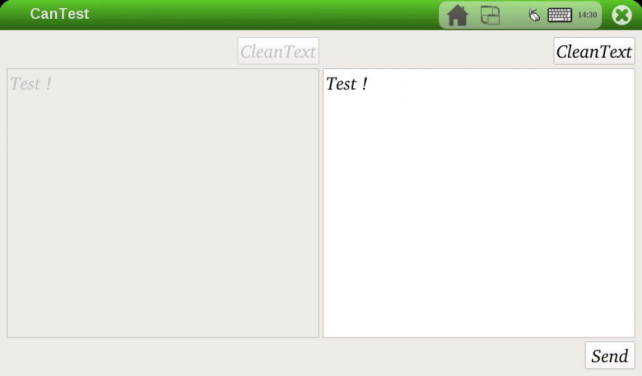
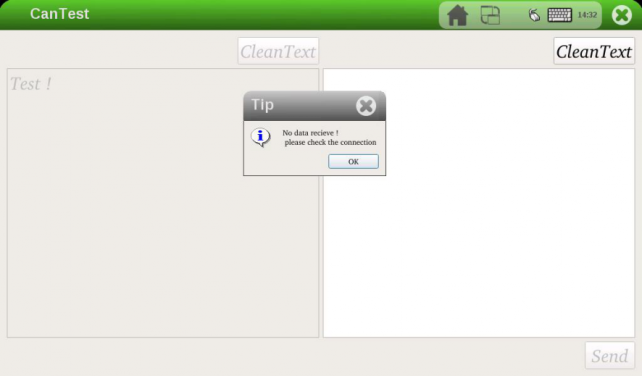
如果没有收到数据,则测试失败,请检查CAN的管脚是否短接,错误如下图:
(3)测试完成,点击关闭,退出CAN测试。
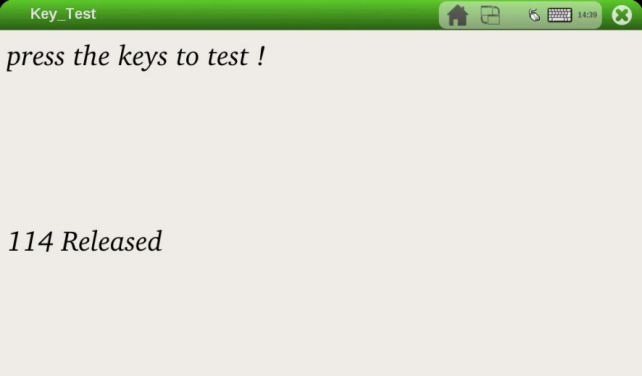
按键测试(key test)
测试说明(test instruction)总共有4个按键,其中一个是复位按键,不在按键测试范围。
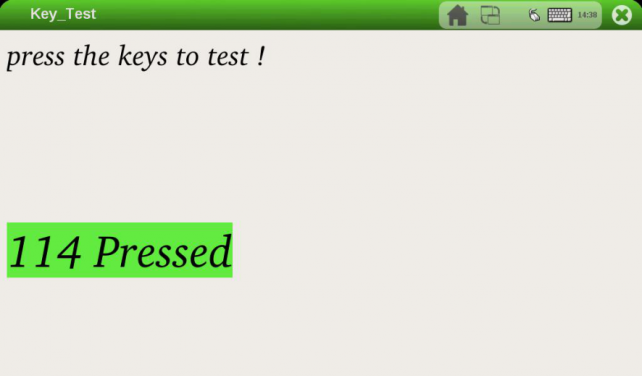
测试说明(test instruction)(1)点击“Key”图标,启动测试程序。(2)按下和松开其中一个按键(不包括复位按键),屏幕会显示按键的号码和状态,如下图: (3)测试完成,点击关闭,退出按键测试。
串口测试(serial port test)
测试说明(test instruction)(1)总共有4个串口,测试程序默认选择Uart2,可以根据需要选择其他串口。
(2)测试之前需要短接串口的收发管脚,不同的开发板短接的管脚有所不同,对应关系如下图:
评估板型号
(development board model no.) | UARTx | Rx | Tx | 系统接口
(system interface) | | MY-IMX6-EK200 | UART2 | J1:9 | J1:7 | ttymxc1 | | UART3 | J1:13 | J1:11 | ttymxc2 | | UART4 | J1:17 | J1:15 | ttymxc3 | | UART5 | J1:16 | J1:18 | ttymxc4 | | MY-IMX6-EK314 | UART2 | J12:9 | J12:10 | ttymxc1 | | UART3 | J12:12 | J12:13 | ttymxc2 | | UART4 | J12:17 | J12:15 | ttymxc3 | | UART5 | J12:16 | J12:18 | ttymxc4 |
(3)这里选择默认配置,即Uart2,请短接对应的管脚。
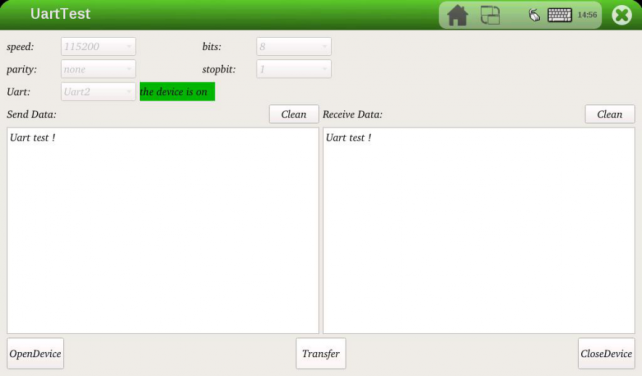
测试方法(test method)(1) 点击“Uart”图标,启动测试程序。 (2) 点击“OpenDevice”打开设备。 (3) 点击”Transfer“发送数据。 (4) 如果成功收到数据,右边的文本框会显示出来,说明测试成功,如下图:
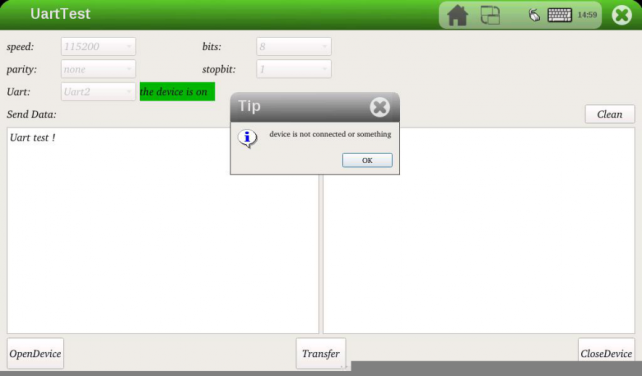
如果没有收到数据,则测试失败,请检查Uart管脚是否短接,错误如下图:
(5)测试完成,点击关闭,退出串口测试。
SPI测试(SPI test)
测试说明(test instruction)(1)测试之前需要短接SPI的管脚,不同的开发板短接的管脚有所不同,对应关系如下:
评估板型号
(development board model no.) | SPIx | MISO | MOSI | | MY-IMX6-EK200 | SPI1 | J7:7 | J7:9 | | SPI2 | J7:8 | J7:10 | | MY-IMX6-EK314 | SPI1 | J13:7 | J13:11 | | SPI2 | J13:6 | J13:12 |
(2)EK200与测试程序对应的是SPI2;EK314与测试程序对应的是SPI1;根据实际情况短接相应的管脚。测试方法(test method) (1)点击“SPI”图标,启动测试程序。(2)点击“OpenDevice”打开设备。 (3)点击“transfer”,发送数据。如果成功收到数据,会在右边的文本框显示出来,说明测试成功,如下图: 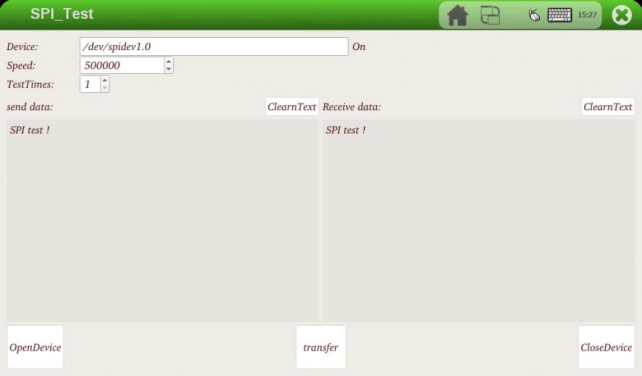
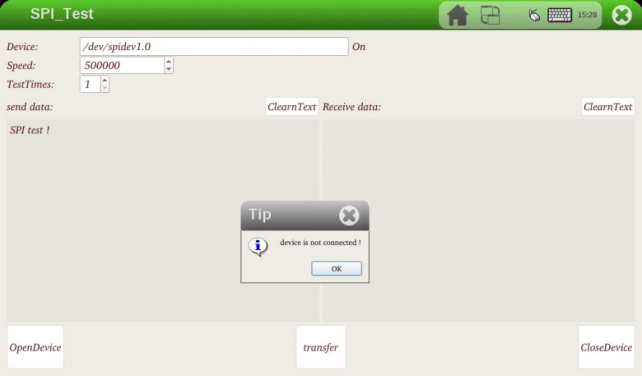
如果没有收到数据,测试失败,请检查管脚是否短接,错误如下图:
(4)测试完成,点击关闭,退出测试程序。
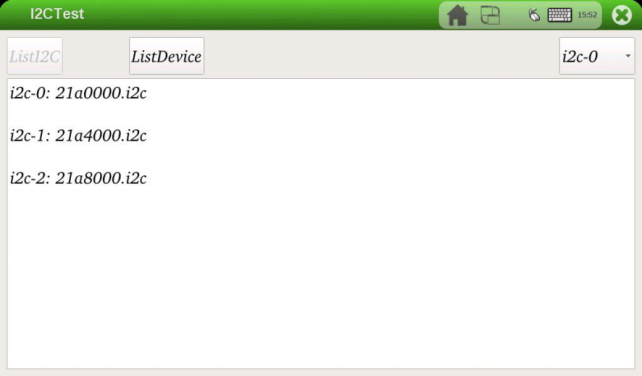
I2C测试(I2C test)
测试说明(test instruction)评估板总共有3条IIC总线,每条总线都有设备,测试程序仅仅是列出每条总线的设备而已,其他不做测试。
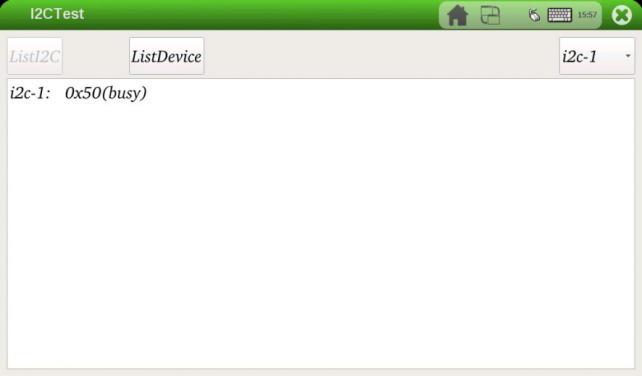
测试方法(test method)(1) 点击“I2C”图标,启动测试程序。(2) 点击“ListI2C”,列出所有I2C总线,总共3条,如下图: (3)点击“ListDevice”列出其中一条总线上的所有设备,默认是i2c-0,如下图:

(4)点击右边的下拉菜单,分别列出另外两条总线上的设备,如下图:

(5)测试完成,点击关闭,退出测试。
GPIO测试(GPIO test)
测试说明(test instruction)(1)测试之前需要连接对应的管脚,不同的开发板所连接的管脚有所不同,对应关系如下:
MY-IMX6-EK200 | IO序号
(IO order number) | GPIO属性
(GPIO property) | 接口位置
(interface position) | | 接口位置
(interface position) | GPIO属性
(GPIO property) | IO序号
(IO order number) | | -- | gpio-leds | J4:3 | J4:4 | GPIO6_IO11 | 171 | | -- | gpio-leds | J4:5 | J4:6 | GPIO2_IO26 | 58 | | 10 | GPIO1_IO10 | J4:7 | J4:8 | GPIO1_IO20 | 20 | | -- | gpio-leds | J4:9 | J4:10 | GPIO3_IO21 | 85 | | -- | gpio-leds | J4:11 | J4:12 | GPIO3_IO22 | 86 | | 11 | GPIO1_IO11 | J4:13 | J4:14 | NC | NC | | 192 | GPIO7_IO00 | J21:12 | J21:11 | GPIO3_IO30 | 94 |
MY-IMX6-EK314 | IO序号
(IO order number) | GPIO属性
(GPIO property) | 接口位置
(interface position) | | 接口位置
(interface position) | GPIO属性
(GPIO property) | IO序号
(IO order number) | | 2 | GPIO1_IO02 | J23:11 | J23:12 | GPIO3_IO30 | 94 | | 192 | GPIO7_IO01 | U14:3 | U14:4 | GPIO7_IO00 | 192 | | 177 | GPIO6_IO17 | U14:5 | U14:6 | GPIO6_IO18 | 178 | | 176 | GPIO6_IO16 | U14:7 | U14:8 | GPIO2_IO07 | 39 | | 35 | GPIO2_IO03 | U14:9 | U14:10 | GPIO2_IO06 | 38 | | 169 | GPIO6_IO09 | U14:11 | U14:12 | GPIO6_IO11 | 171 | | 34 | GPIO2_IO02 | U14:13 | U14:14 | GPIO2_IO00 | 32 | | 36 | GPIO2_IO04 | U14:15 | U14:16 | GPIO2_IO05 | 37 | | 29 | GPIO1_IO29 | U14:17 | U14:18 | GPIO1_IO27 | 27 | | 30 | GPIO1_IO30 | U14:19 | U14:20 | GPIO1_IO26 | 26 | | 24 | GPIO1_IO24 | U14:21 | U14:22 | GND | GND | | 10 | GPIO1_IO10 | U14:23 | U14:24 | gpio-leds | -- | | -- | gpio-leds | U14:25 | U14:26 | gpio-leds | -- | | 11 | GPIO1_IO11 | U14:27 | U14:28 | gpio-leds | -- | | 85 | GPIO3_IO21 | U14:29 | U14:30 | GPIO3_IO22 | 86 | | GND | GND | U14:31 | U14:32 | GND | GND | | 18 | GPIO1_IO18 | U14:33 | U14:34 | GPIO1_IO16 | 16 | | 20 | GPIO1_IO20 | U14:35 | U14:36 | GPIO1_IO17 | 17 | | 116 | GPIO4_IO20 | U14:37 | U14:38 | GPIO1_IO19 | 19 |
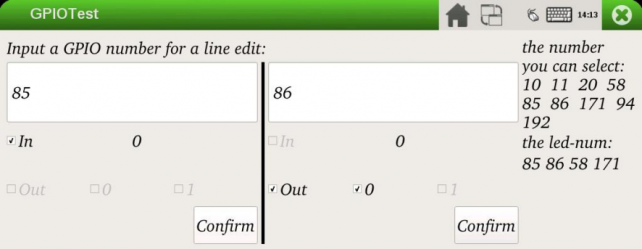
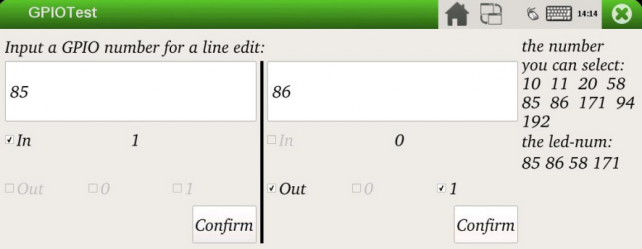
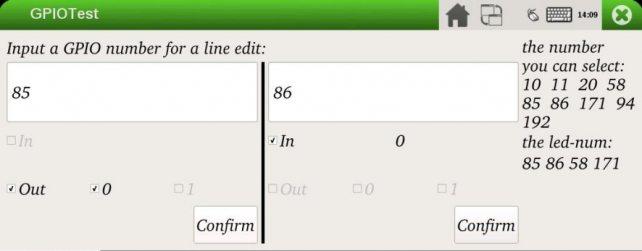
(2)测试程序默认选择的是85、86两个IO序号,也可以根据需要选择其他IO序号;所以测试之前需要短接相应的管脚。 (3)测试程序的目的是测试85、86两个IO序号对应的管脚的输入输出功能。 (4)把85的输出作为86的输入。 (5)把86的输出作为85的输入。
测试方法(test method)(1)点击“GPIO”图标,启动测试程序。(2)点击黑线左边的“out”,再点击“0”,最后点“Confirm”。(3)点击黑线右边的“In”,再点“Confirm”;这时“In”后面会显示左边输出的值,为0。(4)改变左边输出的值,把“0”的沟去掉,选“1”,最后点击“Confirm”,这时右边的In后面会跟随改变,即显示“1”。说明85的输出和86的输入正常。如下图: (5)反过来测试,把黑线左边“out”的沟去掉,改为“In”,然后点击“Confirm”。
turn the test,remove check“out”on left side of black line,select“In”,then click“Confirm”。
(6)把右边的“In”的沟去掉,改为“out”,然后点击“0”,输出0,最后点击“Confirm”,这时左边的“In”后面会显示右边输出的值,即0。
remove check“In”on the right,select“out”,then click“0”,output 0,finally click“Confirm”,then value outputed on the right is 0 behind “In”on the left。
(7)改变右边的输出,把“0”的沟去掉,改为“1”,然后点击“Confirm”,这时左边的显示值会跟随改变,到此说明85、86的输入输出正常。如下图:
change output on the right,remove check“0”,select“1”,then click“Confirm”,then value shown up on the left will change accordingly,so far it means input&output of 85、86 are normal。as below:
(8)测试完成,点击关闭,退出测试程序。
test is over,click close,to exit test program。
网口测试(network interface test)
测试说明(test instruction)(1)测试程序有两个,一个在开发板运行,另一个在PC(windows)上运行。
there are two test programs,one runs on development board,the other runs on PC(windows)。
(2)开发板上有两个网口。
there are two network interfaces on development board。
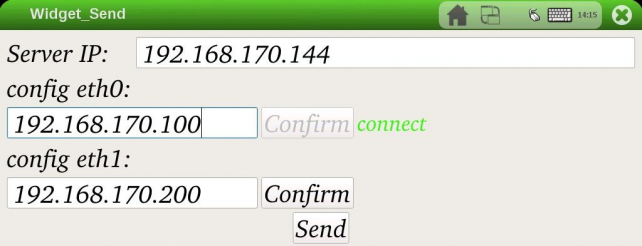
(3)测试之前需要修改PC上的IP,把PC上的IP改为192.168.170.144(实际上只要开发板和PC在同一个网段就可以了)。
need to modify IP on PC before test,change IP on PC to be 192.168.170.144(in fact as long as development board and PC are on the same network segment,that fulfill the task)。
测试方法(test method)(1)用网线把PC和开发板(任意一个网口)连接。
connect PC and development board(any lan port) with lan line。
(2)在PC端运行测试程序。
run test program at PC side。
(3)点击“Network图标”,启动测试程序。
click icon“Network”,to start test program。
(4)点击任意一个”Confirm”,如果连接上,其右边会显示绿色的“connect”;如果出现“unconnect”说明没有连上,这时点击另一个“Confirm”。如图
click any”Confirm”,if connected successfully,green“connect”will be shown on the right;if “unconnect”shown up,e.g unsuccessful connection,then click another“Confirm”。example as below
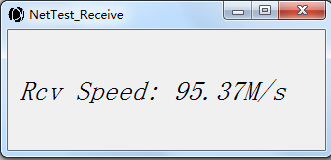
(5)连上之后点击“Send”;在PC端可以看到接收速率的变化;测试成功。如图:
after connection click“Send”;you can see the changing receving rate on PC side;e.g a successful test。as below:
(6)另外一个网口测试方法相同。
the same method for the test of another network interface。
(7)测试完成,点击关闭,退出测试程序。
test is over,click close,to exit test program。
多媒体测试(multimedia test)
测试说明(test instruction)测试程序测试音频和视频的功能。
test program will test function of audio and video。
测试方法(test method)(1) 点击“Media”图标,启动测试程序。
click icon“Media”,to start test program。
(2) 插上耳机,点击“PlayMusic”,可以听到一段音乐。
insert an earphone,click“PlayMusic”,a piece of music can be heard。
(3) 点击“PlayVideo”,播放一段视频。
click“PlayVideo”,to play a piece of video。
(4) 测试完成,点击关闭,退出测试程序。
test is over, click close,to exit test program。
USB&SD测试(USB&SD test)
测试说明(test instruction)测试测试主要测试USB和SD。
this test is to test USB and SD。
测试方法(test method)(1) 点击“SD-USB”图标,启动测试程序。
click icon“SD-USB”,to start test program。
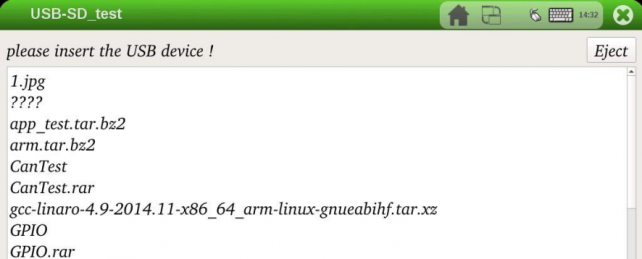
(2) 插入U盘或者SD卡,屏幕会显示U盘或者SD卡的内容(中文不能正常显示)。
insert U disk or SD card,content of U disk or SD card will be displayed on screen(Chinese charaters can't be displayed normally)。
(3)测试完成,点击关闭,退出测试程序。
test is over, click close,to exit test program。
看门狗测试(watchdog test)测试说明(test instruction)如果不喂狗,默认10s复位,也可以根据需要修改时间。
if no feeding dog,defauted reset time is 10 seconds,but this time period can also be modified according to actual need。
测试方法(test method)(1)点击“WTDog”图标,启动测试程序。
click icon“WTDog”,to start test program。
(2)点击“Start”,开始测试。
click“Start”,to start test。
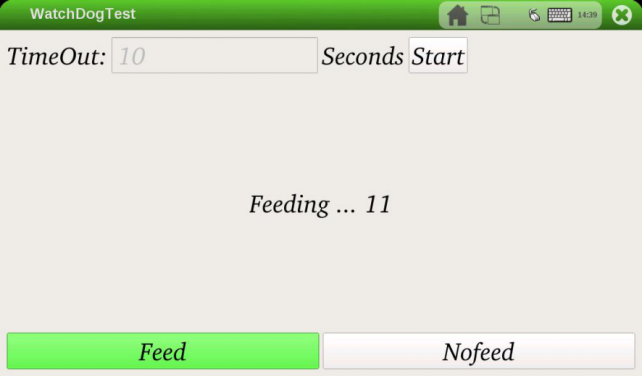
(3)点击“Feed”,进行喂狗;屏幕上会显示喂狗次数;等待20s,如果没有复位,说明喂狗成功。如图:
click“Feed”,to feed dog;number of times for feeding dog will be shown on screen;wait for 20s,if there is not re-set,e.g.a successfull dog feeding。as below:
(5)点击“Nofeed”,停止喂狗,等待10,系统将会复位。
click“Nofeed”,to stop dog feeding,wait for 10 seconds,system will reset。
(6)测试完成,点击关闭,退出测试程序。
test is over, click close, to exit test program。
GPU测试(GPU test)测试说明(test instruction)测试过程,在屏幕上会看到有图形在变化。
during the course of test,you can see a changing images on the screen。
测试方法(test method)(1) 点击“GPU”图标,启动测试程序。
click icon“GPU”,to start test program。
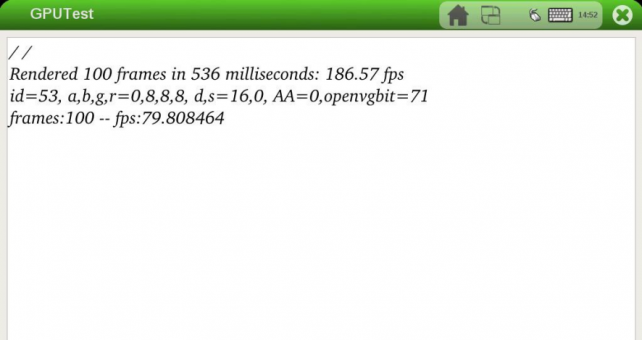
(2) 等待测试完成,最后会打印测试结果。如图:
wait untill test if finished,finally a test result will be printed out。as shown in the figure
VPU测试(VPU test)测试说明(test instruction)测试过程,会播放一段视频。
in the test process,a piece of video will be played。
测试方法(test method)(1) 点击“VPU”图标,启动测试程序。
click icon“VPU”,to start test program。
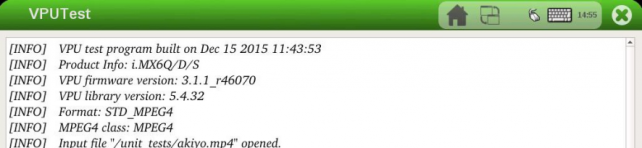
(2) 等待测试完成,最后会打印测试结果。如图:
wait untill test if finished,finally a test result will be printed out,as below:
| 


 楼主
楼主

 标题置顶
标题置顶 标题高亮
标题高亮


;)