[应用方案] ESP8266 wifi模块上传数据到yeelink平台

[复制链接]
 楼主| Bermanrep 发表于 2016-11-22 21:01 | 显示全部楼层 |阅读模式
上期我们实现了局域网内的wifi控制,基于上面的库文件,我们今天给大家带来使用yeelink平台的upload教程,小伙伴还可以用手机随时随地观看数据变化情况。

所需配件:

步骤:

1. 硬件连接


接线示意图


硬件实物连接图


2. 注册Yeelink账号

在烧写程序之前,我们必须做一些准备工作:注册Yeelink账号,并获取属于自己的API KEY和对应设备、传感器的ID地址值。ESP8266通过地址信息将DHT11的温度信息上传到服务器系统中唯一的标示图上,这样可以在Yeelink的网页上实时观察到该传感器当前环境温度信息。

步骤如下:

第一步,注册用户。Yeelink的地址为:http://www.yeelink.net/

第二步,点击“账号”目录下的“我的账户设置”按钮,记下当前的API KEY,在本例中,API KEY为“7bf75e6c2c8a17351d557f206f89fa2e”。


第三步,点击“我的设备”目录下的“添加新设备”按钮,并按照如下内容范例填写,然后点击保存按钮。


第四步,添加新设备完毕后还需要为该设备增加一个或多个传感器(一个设备可以同时支持多个传感器)。点击“传感器”栏下的“+增加一个传感器”按钮,进入添加传感器的页面。按照如下内容范例填写,然后点击保存。


 楼主| Bermanrep 发表于 2016-11-22 21:02 | 显示全部楼层
第五步,保存后,在管理设备页面的下方会出现一个数据曲线的图表。设备的ID值为数据曲线的URL中device后面那串数字,而传感器的ID值为数据曲线的URL中sensor后面那串数字,记下该设备和传感器的ID值,在本例中温度的设备ID值为3047,传感器ID值为4285; 湿度的设备ID值为3047,传感器ID值为26142。


完成上面的操作后,会得到相应的API KEY,设备的ID值和传感器的ID值。如果想了解更具体的步骤,请查看以下网页:http://www.yeelink.net/developer/doc/42 。

3.烧写程序,我们需要用到ESP8266库,下载地址为:http://pan.baidu.com/s/1sj2nUyT 。库跟第一章的一样,已下载的小伙伴不需要重新下载了。

温馨提示: ESP8266 wifi库文件是基于arduino IDE1.0.5版本编译的,如遇编译不过,请尝试其他版本。

把ESP8266库解压缩到\arduino\libraries目录下。

因为以太网的数据包比较大,我们需要把串口的环形缓冲区的大小改大才能正常显示所有数据。
用记事本打开arduino\hardware\arduino\cores\arduino\HardwareSerial.cpp文件,把第59行的SERIAL_BUFFER_SIZE数值改为500.如下:


#if (RAMEND< 1000)
  #define SERIAL_BUFFER_SIZE 16
#else
  #define SERIAL_BUFFER_SIZE 500
#endif
保存修改。

打开下载的库文件里面的uartWIFI.H文件。确认以下两处是否如下:

    #define _DBG_RXPIN_ 2  //使用UNO的时候改为9
    #define _DBG_TXPIN_ 3  //使用UNO的时候改为10
    #define debugBaudRate 9600
   //#define UNO  //使用UNO的时候取消这行的注释
     #define MEGA //使用mega的时候注释掉这行

确认无误,保存。

复制以下demo代码到arduino IDE。
 楼主| Bermanrep 发表于 2016-11-22 21:04 | 显示全部楼层
  1. #define PASSWORD   "27955416"                                //type your own WIFI password


  2. #include "uartWIFI.h"
  3. #include <SoftwareSerial.h>
  4. WIFI wifi;

  5. extern int chlID;        //client id(0-4)

  6. // for yeelink api
  7. #define APIKEY         "3a362e99d6f1daf974561163a8c99a85" // replace your yeelink api key here

  8. //replace the device ID and sensor ID for temperature sensor.
  9. #define DEVICEID0       15483 // replace y**ice ID
  10. #define SENSORID0       26660 // replace your sensor ID

  11. //replace the device ID and sensor ID for humidity sensor.
  12. #define DEVICEID1       15483 // replace y**ice ID
  13. #define SENSORID1       26661 // replace your sensor ID

  14. char server[] = "api.yeelink.net";   // name address for yeelink API

  15. unsigned long lastConnectionTime = 0;          // last time you connected to the server, in milliseconds
  16. boolean lastConnected = false;                 // state of the connection last time through the main loop
  17. const unsigned long postingInterval = 5*1000; // delay between 2 datapoints, 5s
  18. String returnValue = "";
  19. boolean ResponseBegin = false;


  20. int DHT11PIN=25;                        //Connect D25 to data pin of DHT11


  21. int humidity;
  22. int temperature;

  23. int post_number;

  24. void setup()
  25. {

  26.   wifi.begin();
  27.   bool b = wifi.Initialize(STA, SSID, PASSWORD);
  28.   if(!b)
  29.   {
  30.     DebugSerial.println("Init error");
  31.   }
  32.   delay(8000);  //make sure the module can have enough time to get an IP address
  33.   String ipstring  = wifi.showIP();
  34.   DebugSerial.println(ipstring);                //show the ip address of module
  35.   

  36.         

  37. }
  38. void loop()
  39. {
  40.   char message[400];
  41.    // if you're not connected, and ten seconds have passed since
  42.   // your last connection, then connect again and send data:
  43.   if((millis() - lastConnectionTime > postingInterval)) {
  44.   
  45.   //read dht11
  46.   int chk = dht11_read(DHT11PIN);
  47.   if(chk==0)
  48.   {
  49.         if(post_number==0)
  50.         {
  51.                 sendData(DEVICEID0,SENSORID0,temperature);
  52.                 post_number++;
  53.         }
  54.         else
  55.         {
  56.                 post_number = 0;
  57.                 sendData(DEVICEID1,SENSORID1,humidity);
  58.         }
  59.         
  60.   }
  61.   
  62.   }
  63.   
  64.   // if there's incoming data from the net connection.
  65.   // send it out the serial port.  This is for debugging
  66.   // purposes only:
  67.   if(wifi.ReceiveMessage(message))
  68.   {
  69.       DebugSerial.println(message);   
  70.   }


  71.   delay(10);

  72. }
 楼主| Bermanrep 发表于 2016-11-22 21:05 | 显示全部楼层
  1. // this method makes a HTTP connection to the server:
  2. void sendData(int device_id,int sensor_id,int thisData) {
  3.   // if there's a successful connection:
  4.   if (wifi.ipConfig(TCP,server, 80)) {
  5.     DebugSerial.println("connecting...");
  6.     // send the HTTP PUT request:
  7.     String cmd;
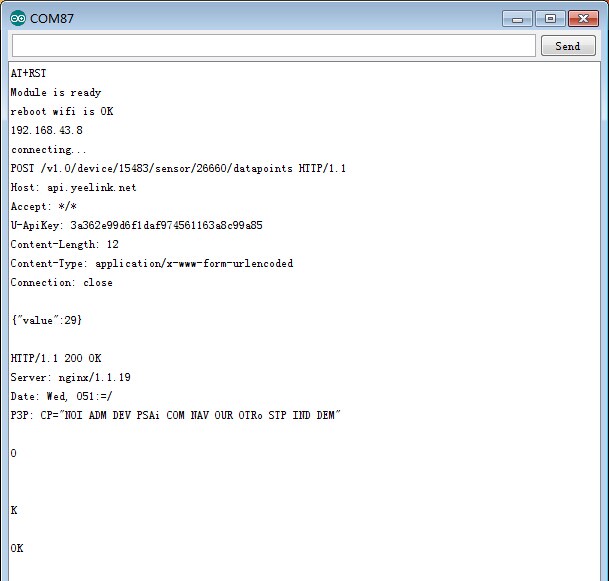
  8.         cmd = "POST /v1.0/device/";
  9.         cmd += String(device_id);
  10.         cmd += "/sensor/";
  11.         cmd += String(sensor_id);
  12.         cmd += "/datapoints";
  13.         cmd += " HTTP/1.1\r\n";
  14.         cmd += "Host: api.yeelink.net\r\n";
  15.         cmd += "Accept: *";
  16.         cmd += "/";
  17.         cmd += "*\r\n";
  18.         cmd += "U-ApiKey: ";
  19.         cmd += APIKEY;
  20.         cmd += "\r\n";
  21.         cmd += "Content-Length: ";
  22.         int thisLength = 10 + getLength(thisData);
  23.     cmd += String(thisLength);
  24.         cmd += "\r\n";
  25.         cmd += "Content-Type: application/x-www-form-urlencoded\r\n";
  26.         cmd += "Connection: close\r\n";
  27.         cmd += "\r\n";
  28.         cmd += "{"value":";
  29.         cmd += String(thisData);
  30.         cmd += "}\r\n";
  31.         
  32.         
  33.         DebugSerial.println(cmd);
  34.         
  35.     wifi.Send(cmd);
  36.     // note the time that the connection was made:
  37.     lastConnectionTime = millis();
  38.   }
  39.   else {
  40.     // if you couldn't make a connection:
  41.     DebugSerial.println("connection failed");
  42.     DebugSerial.println("disconnecting.");
  43.     wifi.closeMux();
  44.   }
  45. }

  46. int getLength(int someValue) {
  47.   // there's at least one byte:
  48.   int digits = 1;
  49.   // continually divide the value by ten,
  50.   // adding one to the digit count for each
  51.   // time you divide, until you're at 0:
  52.   int dividend = someValue /10;
  53.   while (dividend > 0) {
  54.     dividend = dividend /10;
  55.     digits++;
  56.   }
  57.   // return the number of digits:
  58.   return digits;
  59. }


  60. int dht11_read(int pin)
  61. {
  62.         // BUFFER TO RECEIVE
  63.         int bits[5];
  64.         int cnt = 7;
  65.         int idx = 0;

  66.         // EMPTY BUFFER
  67.         for (int i=0; i< 5; i++)
  68.         {bits= 0;}

  69.         // REQUEST SAMPLE
  70.         pinMode(pin, OUTPUT);
  71.         digitalWrite(pin, LOW);
  72.         delay(18);
  73.         digitalWrite(pin, HIGH);
  74.         delayMicroseconds(40);
  75.         pinMode(pin, INPUT);

  76.         // ACKNOWLEDGE or TIMEOUT
  77.         unsigned int loopCnt = 10000;
  78.         while(digitalRead(pin) == LOW)
  79.                 if (loopCnt-- == 0) return -2;

  80.         loopCnt = 10000;
  81.         while(digitalRead(pin) == HIGH)
  82.                 if (loopCnt-- == 0) return -2;

  83.         // READ OUTPUT - 40 BITS => 5 BYTES or TIMEOUT
  84.         for (int i=0; i<40; i++)
  85.         {
  86.                 loopCnt = 10000;
  87.                 while(digitalRead(pin) == LOW)
  88.                         if (loopCnt-- == 0) return -2;

  89.                 unsigned long t = micros();

  90.                 loopCnt = 10000;
  91.                 while(digitalRead(pin) == HIGH)
  92.                         if (loopCnt-- == 0) return -2;

  93.                 if ((micros() - t) > 40) bits[idx] |= (1 << cnt);
  94.                 if (cnt == 0)   // next byte?
  95.                 {
  96.                         cnt = 7;    // restart at MSB
  97.                         idx++;      // next byte!
  98.                 }
  99.                 else cnt--;
  100.         }

  101.         // WRITE TO RIGHT VARS
  102.         // as bits[1] and bits[3] are allways zero they are omitted in formulas.
  103.         humidity    = bits[0];
  104.         temperature = bits[2];

  105.         int sum = bits[0] + bits[2];  

  106.         if (bits[4] != sum) return -1;
  107.         return 0;
  108. }
 楼主| Bermanrep 发表于 2016-11-22 21:06 | 显示全部楼层
  1. 在SSID和PASSWORD宏定义中修改成自己的WIFI名称和密码。

  2. #define SSID      "Itead_1(Public)"        //type your own SSID name
  3. #define PASSWORD  "27955416"            //type your own WIFI password

  4. 接着,把刚才所取得的APIKEY,设备的ID值和传感器的ID值替换到程序相应的位置中。设备的ID值替换代码中DEVICEID的值,传感器的ID值替换代码中SENSORID的值。

  5. // for yeelink api
  6. #define APIKEY         "7bf75e6c2c8a17351d557f206f89fa2e"// replace your yeelink api key here
  7. //replace the device ID and sensor ID for temperature sensor.
  8. #define DEVICEID0       3047 //replace y**ice ID
  9. #define SENSORID0       4285 //replace your sensor ID
  10. //replace the device ID and sensor ID for humidity sensor.
  11. #define DEVICEID1       3047 // replacey**ice ID
  12. #define SENSORID1       26142 //replace your sensor ID
修改完后,把该程序烧写到mega中去。

然后打开Serial monitor,等待一段时间后,会看到串口会显示它的ip地址,接着他就会每隔10s钟上传一次数据。


3. 查看数据图表

用网页打开yeelink平台,输入账号密码后,在用户中心的“我的设备”里可以看到温度和湿度的数据曲线。

手机还可以下载yeelink的客户端:http://www.yeelink.net/developer/tools


643757107 发表于 2016-11-22 21:52 | 显示全部楼层
如果用自己的服务器该如何玩呢
643757107 发表于 2016-11-23 19:33 | 显示全部楼层
我就想知道怎么通信的。
popoton 发表于 2016-12-4 22:47 | 显示全部楼层
项目源代码发一下就更赞了.
您需要登录后才可以回帖 登录 | 注册

本版积分规则

22

主题

132

帖子

2

粉丝
快速回复 在线客服 返回列表 返回顶部

22

主题

132

帖子

2

粉丝
快速回复 在线客服 返回列表 返回顶部