本帖最后由 Peixu 于 2024-10-25 17:26 编辑
TPL0102 是一种双通道数字电位器,常用于各种电子设备的音量控制、亮度调节等应用。它通过 I2C 总线与主控进行通信,能够实现精确的电位调节。本文将详细介绍如何使用 APM32F003 微控制器驱动 TPL0102。
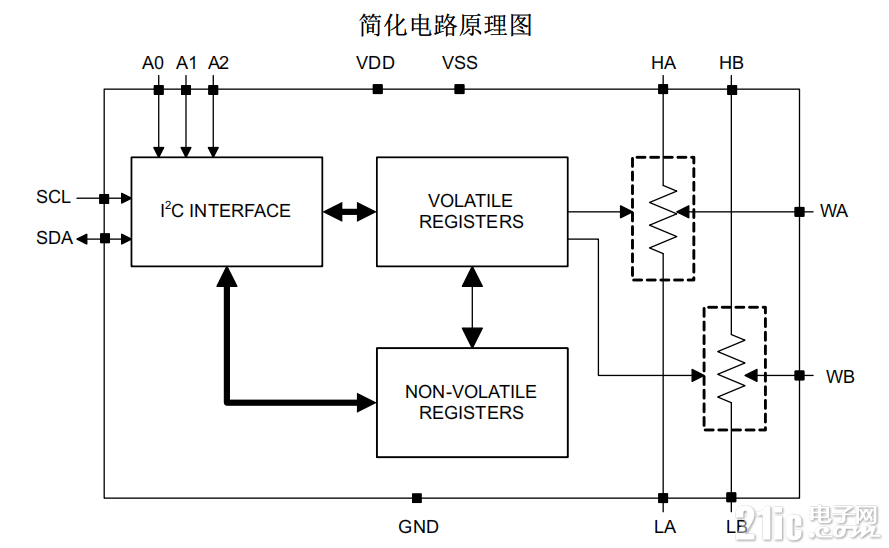
TPL0102内部简化原理图如下所示:
TPL0102内有A、B两个电位器,通过IIC协议可以分别控制A、B两个电位器输出0-100K的电阻值,当然也可以将A、B两个电位器串联起来实现0-200K的电阻值输出。

下来就是驱动代码实现:
1、首先是I2C 初始化这里使用的是模拟IIC 如下所示
- #include "i2c1.h"
- // 初始化I2C的GPIO引脚
- void I2C_Init(void) {
-
- GPIO_Config_T gpioConfig;
- gpioConfig.mode = GPIO_MODE_OUT_OD;
- gpioConfig.speed = GPIO_SPEED_10MHz;
- gpioConfig.intEn = GPIO_EINT_DISABLE;
- gpioConfig.pin = I2C_SCL_PIN | I2C_SDA_PIN;
- GPIO_Config(I2C_GPIO_PORT, &gpioConfig);
- I2C_Stop();
- }
- /**
- * [url=home.php?mod=space&uid=247401]@brief[/url] I2C 开始,SCL为高电平的时候SDA产生一个下降沿信号
- */
- void I2C_Start(void) {
-
- /* _____
- *SDA \_____________
- * __________
- *SCL \________
- */
- GPIO_SetBit(I2C_GPIO_PORT, I2C_SDA_PIN);
- GPIO_SetBit(I2C_GPIO_PORT, I2C_SCL_PIN);
- timer_delay_ms(1);
- GPIO_ClearBit(I2C_GPIO_PORT, I2C_SDA_PIN);
- timer_delay_ms(1);
- GPIO_ClearBit(I2C_GPIO_PORT, I2C_SCL_PIN);
- timer_delay_ms(1);
- }
- // 生成I2C停止条件
- void I2C_Stop(void) {
- /* _______
- *SDA __________/
- * ____________
- *SCL _____/
- */
- GPIO_ClearBit(I2C_GPIO_PORT, I2C_SDA_PIN);
- GPIO_SetBit(I2C_GPIO_PORT, I2C_SCL_PIN);
- timer_delay_ms(1);
- GPIO_SetBit(I2C_GPIO_PORT, I2C_SDA_PIN);
- timer_delay_ms(1);
- }
- // 发送I2C应答信号
- void I2C_Ack(void) {
- /* ____
- *SCL ______/ \______
- * ____ _____
- *SDA \_______/
- */
- GPIO_ClearBit(I2C_GPIO_PORT, I2C_SDA_PIN);
- timer_delay_ms(1);
- GPIO_SetBit(I2C_GPIO_PORT, I2C_SCL_PIN);
- timer_delay_ms(1);
- GPIO_ClearBit(I2C_GPIO_PORT, I2C_SCL_PIN);
- }
- // 发送I2C非应答信号
- void I2C_NAck(void) {
- /* ____
- *SCL ______/ \______
- * __________________
- *SDA
- */
- GPIO_SetBit(I2C_GPIO_PORT, I2C_SDA_PIN);
- timer_delay_ms(1);
- GPIO_SetBit(I2C_GPIO_PORT, I2C_SCL_PIN);
- timer_delay_ms(1);
- GPIO_ClearBit(I2C_GPIO_PORT, I2C_SCL_PIN);
- }
- // 发送一个字节
- void I2C_SendByte(uint8_t byte) {
- for (uint8_t i = 0; i < 8; i++) {
- if (byte & 0x80) {
- GPIO_SetBit(I2C_GPIO_PORT, I2C_SDA_PIN);
- } else {
- GPIO_ClearBit(I2C_GPIO_PORT, I2C_SDA_PIN);
- }
- byte <<= 1;
- timer_delay_ms(1);
- GPIO_SetBit(I2C_GPIO_PORT, I2C_SCL_PIN);
- timer_delay_ms(1);
- GPIO_ClearBit(I2C_GPIO_PORT, I2C_SCL_PIN);
- }
- // 读取应答信号
- GPIO_SetBit(I2C_GPIO_PORT, I2C_SDA_PIN);
- timer_delay_ms(1);
- GPIO_SetBit(I2C_GPIO_PORT, I2C_SCL_PIN);
- timer_delay_ms(1);
- GPIO_ClearBit(I2C_GPIO_PORT, I2C_SCL_PIN);
- }
- // 读取一个字节
- uint8_t I2C_ReadByte(uint8_t ack) {
- uint8_t byte = 0;
- GPIO_SetBit(I2C_GPIO_PORT, I2C_SDA_PIN);
- for (uint8_t i = 0; i < 8; i++) {
- byte <<= 1;
- GPIO_SetBit(I2C_GPIO_PORT, I2C_SCL_PIN);
- timer_delay_ms(1);
- if (GPIO_ReadInputBit(I2C_GPIO_PORT, I2C_SDA_PIN)) {
- byte |= 0x01;
- }
- GPIO_ClearBit(I2C_GPIO_PORT, I2C_SCL_PIN);
- timer_delay_ms(1);
- }
- if (ack) {
- I2C_Ack();
- } else {
- I2C_NAck();
- }
- return byte;
- }
2、TPL0102的代码读写:
- #include "tpl0102.h"
- #define TPL0102_ADDR 0x50 // TPL0102 I2C地址
-
- //TPL0102 Register Addresses
- #define TPL0102_REG_RA 0x00
- #define TPL0102_REG_RB 0x01
- void Test(void)
- {
- I2C_Init();
-
- // 设置电位器值
- TPL0102_SetWiper(TPL0102_REG_RA, 0X66);
- TPL0102_SetWiper(TPL0102_REG_RB, 0X66);
- }
- // 写入TPL0102寄存器
- void TPL0102_WriteReg(uint8_t reg, uint8_t value) {
- I2C_Start();
- I2C_SendByte(TPL0102_ADDR << 1); // 发送设备地址和写命令
- I2C_SendByte(reg); // 发送寄存器地址
- I2C_SendByte(value); // 发送数据
- I2C_Stop();
- }
- // 读取TPL0102寄存器
- uint8_t TPL0102_ReadReg(uint8_t reg) {
- uint8_t value;
- I2C_Start();
- I2C_SendByte(TPL0102_ADDR << 1); // 发送设备地址和写命令
- I2C_SendByte(reg); // 发送寄存器地址
- I2C_Start();
- I2C_SendByte((TPL0102_ADDR << 1) | 1); // 发送设备地址和读命令
- value = I2C_ReadByte(0); // 读取数据
- I2C_Stop();
- return value;
- }
- // 设置TPL0102的电位器值
- void TPL0102_SetWiper(uint8_t wiper, uint8_t value) {
- if (wiper == 0) {
- TPL0102_WriteReg(TPL0102_REG_RA, value); // 设置电位器0
- } else if (wiper == 1) {
- TPL0102_WriteReg(TPL0102_REG_RB, value); // 设置电位器1
- }
- }
- // 读取TPL0102的电位器值
- uint8_t TPL0102_GetWiper(uint8_t wiper) {
- if (wiper == 0) {
- return TPL0102_ReadReg(TPL0102_REG_RA); // 读取电位器0
- } else if (wiper == 1) {
- return TPL0102_ReadReg(TPL0102_REG_RB); // 读取电位器1
- }
- return 0;
- }
- int main(void)
- {
- TMR4_Init();
- I2C_Init();
- while(1)
- {
- // 将目标电阻值映射到TPL0102的步进值
- TPL0102_SetWiper(TPL0102_REG_RA, 0Xff);
- TPL0102_SetWiper(TPL0102_REG_RB, 0X00);
- }
- }

······
······
······

|