- #include <zephyr/dt-bindings/led/led.h>
- &arduino_i2c {
- sht3xd: sht3xd@44 {
- compatible = "sensirion,sht3xd";
- reg = <0x44>;
- alert-gpios = <&gpioa 9 GPIO_ACTIVE_HIGH>;
- };
- };
- / {
- aliases {
- sht3xd = &sht3xd;
- };
- };
三、基础测试
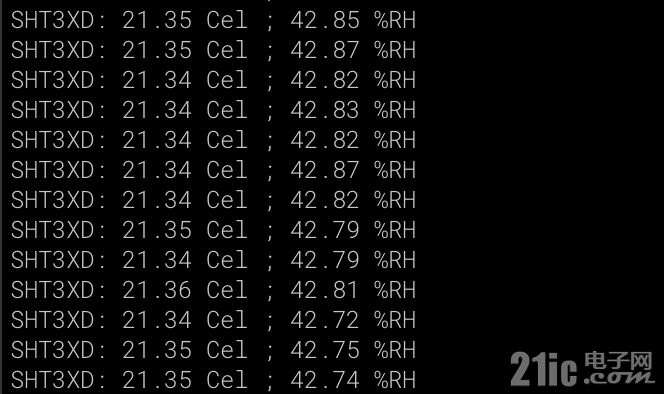
上述overlay处理好以后,就可以直接使用 samples/sensor/sht3xd 实例了。
代码中,读取温湿度信息的核心代码如下:
- rc = sensor_sample_fetch(sht3x_dev);
- if (rc == 0) {
- rc = sensor_channel_get(sht3x_dev, SENSOR_CHAN_AMBIENT_TEMP,
- &temp);
- }
- if (rc == 0) {
- rc = sensor_channel_get(sht3x_dev, SENSOR_CHAN_HUMIDITY,
- &hum);
- }
- if (rc != 0) {
- printf("SHT3XD: failed: %d\n", rc);
- continue;
- }
- printf("SHT3XD: %.2f Cel ; %0.2f %%RH\n",
- sensor_value_to_double(&temp),
- sensor_value_to_double(&hum));
- 使用 sensor_sample_fetch 通知sht30进行数据采样
- 使用 sensor_channel_get 获取温度信息
- 使用 sensor_channel_get 获取湿度信息
- 打印出来
现在,编译上述实例进行测试,编译命令如下:
- west build -b nucleo_u5a5zj_q samples/sensor/sht3xd

四、在屏幕上显示两个仪表盘
因为需要同时显示温度和湿度信息,我们需要在屏幕上,显示两个仪表盘,在 【NUCLEO-U5A5ZJ-Q测评】驱动DFRobot高清彩屏使用lvgl显示动态仪表盘 的基础上,我们只需要做如下的处理即可:
1. 生成中文字体文件:
- lv_font_conv --no-compress --format lvgl --font $ttf_path -o opposans_m_16_sht3x.c --bpp 4 --size 16 -r 0x20-0x7F --symbols "温度湿度"
2. 预定义:
- LV_FONT_DECLARE(opposans_m_16_sht3x);
- static lv_obj_t * meter;
- static lv_obj_t * meter2;
- static lv_meter_indicator_t * indic;
- static lv_meter_indicator_t * indic2;
- static lv_style_t label_style_cn;
3. 温度仪表盘
- void lv_example_sht3x_temp(void)
- {
- meter = lv_meter_create(lv_scr_act());
- lv_obj_align(meter, LV_ALIGN_CENTER, 0, -80);
- lv_obj_set_size(meter, 150, 150);
- /*Add a scale first*/
- lv_meter_scale_t * scale = lv_meter_add_scale(meter);
- lv_meter_set_scale_ticks(meter, scale, 41, 2, 10, lv_palette_main(LV_PALETTE_GREY));
- lv_meter_set_scale_major_ticks(meter, scale, 8, 4, 15, lv_color_black(), 10);
- // lv_meter_indicator_t * indic;
- lv_meter_set_scale_range(meter, scale, -40, 60, 270, 90);
- /*零下*/
- indic = lv_meter_add_arc(meter, scale, 3, lv_palette_main(LV_PALETTE_BLUE), 0);
- lv_meter_set_indicator_start_value(meter, indic, -40);
- lv_meter_set_indicator_end_value(meter, indic, -10);
- /*Make the tick lines blue at the start of the scale*/
- indic = lv_meter_add_scale_lines(meter, scale, lv_palette_main(LV_PALETTE_BLUE), lv_palette_main(LV_PALETTE_BLUE),
- false, 0);
- lv_meter_set_indicator_start_value(meter, indic, -40);
- lv_meter_set_indicator_end_value(meter, indic, -10);
- // /*零上*/
- // indic = lv_meter_add_arc(meter, scale, 3, lv_palette_main(LV_PALETTE_YELLOW), 0);
- // lv_meter_set_indicator_start_value(meter, indic, 0);
- // lv_meter_set_indicator_end_value(meter, indic, 18);
- // /*Make the tick lines blue at the start of the scale*/
- // indic = lv_meter_add_scale_lines(meter, scale, lv_palette_main(LV_PALETTE_YELLOW), lv_palette_main(LV_PALETTE_YELLOW),
- // false, 0);
- // lv_meter_set_indicator_start_value(meter, indic, 0);
- // lv_meter_set_indicator_end_value(meter, indic, 18);
- /*舒适*/
- indic = lv_meter_add_arc(meter, scale, 3, lv_palette_main(LV_PALETTE_GREEN), 0);
- lv_meter_set_indicator_start_value(meter, indic, 17);
- lv_meter_set_indicator_end_value(meter, indic, 27);
- /*Make the tick lines blue at the start of the scale*/
- indic = lv_meter_add_scale_lines(meter, scale, lv_palette_main(LV_PALETTE_GREEN), lv_palette_main(LV_PALETTE_GREEN),
- false, 0);
- lv_meter_set_indicator_start_value(meter, indic, 17);
- lv_meter_set_indicator_end_value(meter, indic, 27);
- /*高温*/
- indic = lv_meter_add_arc(meter, scale, 3, lv_palette_main(LV_PALETTE_RED), 0);
- lv_meter_set_indicator_start_value(meter, indic, 35);
- lv_meter_set_indicator_end_value(meter, indic, 60);
- /*Make the tick lines red at the end of the scale*/
- indic = lv_meter_add_scale_lines(meter, scale, lv_palette_main(LV_PALETTE_RED), lv_palette_main(LV_PALETTE_RED), false,
- 0);
- lv_meter_set_indicator_start_value(meter, indic, 35);
- lv_meter_set_indicator_end_value(meter, indic, 60);
- /*Add a needle line indicator*/
- indic = lv_meter_add_needle_line(meter, scale, 4, lv_palette_main(LV_PALETTE_GREY), -10);
- lv_obj_t *temp_label;
- temp_label = lv_label_create(lv_scr_act());
- lv_label_set_text(temp_label, "温度");
- lv_obj_align(temp_label, LV_ALIGN_CENTER, 40, -50);
- lv_obj_add_style(temp_label, &label_style_cn, LV_PART_MAIN); // 应用效果风格
- }
在温度仪表盘中:
- 定义了从零下40度到零上60度的范围
- 零下40度到零下10度,为蓝色超冷区域
- 零上17度到27度,为绿色合适温度区域
- 零上35度到60度,为红色超热温度区域
- 合适的区域显示“温度”标签
4. 湿度仪表盘
- void lv_example_sht3x_humi(void)
- {
- meter2 = lv_meter_create(lv_scr_act());
- lv_obj_align(meter2, LV_ALIGN_CENTER, 0, 80);
- lv_obj_set_size(meter2, 150, 150);
- /*Add a scale first*/
- lv_meter_scale_t * scale = lv_meter_add_scale(meter2);
- lv_meter_set_scale_ticks(meter2, scale, 41, 2, 10, lv_palette_main(LV_PALETTE_GREY));
- lv_meter_set_scale_major_ticks(meter2, scale, 8, 4, 15, lv_color_black(), 10);
- // lv_meter_indicator_t * indic2;
- lv_meter_set_scale_range(meter2, scale, 0, 100, 270, 90);
- /*较低*/
- indic2 = lv_meter_add_arc(meter2, scale, 3, lv_palette_main(LV_PALETTE_BLUE), 0);
- lv_meter_set_indicator_start_value(meter2, indic2, 0);
- lv_meter_set_indicator_end_value(meter2, indic2, 20);
- /*Make the tick lines blue at the start of the scale*/
- indic2 = lv_meter_add_scale_lines(meter2, scale, lv_palette_main(LV_PALETTE_BLUE), lv_palette_main(LV_PALETTE_BLUE),
- false, 0);
- lv_meter_set_indicator_start_value(meter2, indic2, 0);
- lv_meter_set_indicator_end_value(meter2, indic2, 20);
- /*合适*/
- indic2 = lv_meter_add_arc(meter2, scale, 3, lv_palette_main(LV_PALETTE_GREEN), 0);
- lv_meter_set_indicator_start_value(meter2, indic2, 40);
- lv_meter_set_indicator_end_value(meter2, indic2, 60);
- /*Make the tick lines blue at the start of the scale*/
- indic2 = lv_meter_add_scale_lines(meter2, scale, lv_palette_main(LV_PALETTE_GREEN), lv_palette_main(LV_PALETTE_GREEN),
- false, 0);
- lv_meter_set_indicator_start_value(meter2, indic2, 40);
- lv_meter_set_indicator_end_value(meter2, indic2, 60);
- /*高温较高*/
- indic2 = lv_meter_add_arc(meter2, scale, 3, lv_palette_main(LV_PALETTE_RED), 0);
- lv_meter_set_indicator_start_value(meter2, indic2, 80);
- lv_meter_set_indicator_end_value(meter2, indic2, 100);
- /*Make the tick lines red at the end of the scale*/
- indic2 = lv_meter_add_scale_lines(meter2, scale, lv_palette_main(LV_PALETTE_RED), lv_palette_main(LV_PALETTE_RED), false,
- 0);
- lv_meter_set_indicator_start_value(meter2, indic2, 80);
- lv_meter_set_indicator_end_value(meter2, indic2, 100);
- /*Add a needle line indicator*/
- indic2 = lv_meter_add_needle_line(meter2, scale, 4, lv_palette_main(LV_PALETTE_GREY), -10);
- lv_obj_t *humi_label;
- humi_label = lv_label_create(lv_scr_act());
- lv_label_set_text(humi_label, "湿度");
- lv_obj_align(humi_label, LV_ALIGN_CENTER, 40, 110);
- lv_obj_add_style(humi_label, &label_style_cn, LV_PART_MAIN); // 应用效果风格
- }
在湿度仪表盘中:
- 定义了从0到100的范围
- 0到20,为蓝色干燥区域
- 40到60,为绿色合适湿度区域
- 80~100,为红色超湿温度区域
- 合适的区域显示“湿度”标签
然后,在主代码中,使用下面的代码,来绘制上述两个仪表盘:
- lv_obj_clean(lv_scr_act());
- lv_example_sht3x_temp();
- lv_example_sht3x_humi();
- while(1) {
- lv_task_handler();
- k_sleep(K_MSEC(5000));
- }
最终的实际效果如下:

五、结合温湿度传感器的数据,更新到仪表盘
上面已经显示了两个仪表盘,下一步,把温湿度信息给整合进来即可。
1. prj.conf处理
首先,需要在prj.conf中添加sht3x的配置:
- # sht3x
- CONFIG_I2C=y
- CONFIG_SENSOR=y
- CONFIG_CBPRINTF_FP_SUPPORT=y
2. main.c代码处理
头文件调用部分添加:
- #include <zephyr/drivers/sensor.h>
main()部分设备初始化检查:
- const struct device *const sht3x_dev = DEVICE_DT_GET_ONE(sensirion_sht3xd);
- int rc;
- if (!device_is_ready(sht3x_dev)) {
- printf("Device %s is not ready\n", sht3x_dev->name);
- return 0;
- }
while循环部分读取温湿度信息,并更新到仪表盘:
- struct sensor_value temp, hum;
- while(1) {
- rc = sensor_sample_fetch(sht3x_dev);
- if (rc == 0) {
- rc = sensor_channel_get(sht3x_dev, SENSOR_CHAN_AMBIENT_TEMP,
- &temp);
- }
- if (rc == 0) {
- rc = sensor_channel_get(sht3x_dev, SENSOR_CHAN_HUMIDITY,
- &hum);
- }
- if (rc != 0) {
- printf("SHT3XD: failed: %d\n", rc);
- continue;
- }
- printf("SHT3XD: %.2f Cel ; %0.2f %%RH\n",
- sensor_value_to_double(&temp),
- sensor_value_to_double(&hum));
- lv_meter_set_indicator_value(meter, indic, sensor_value_to_double(&temp));
- lv_meter_set_indicator_value(meter2, indic2, sensor_value_to_double(&hum));
- lv_task_handler();
- k_sleep(K_MSEC(5000));
- }
在上述代码中,参考sht3xd实例读取出来温湿度数据,然后使用 lv_meter_set_indicator_value 更新仪表盘的value即可。
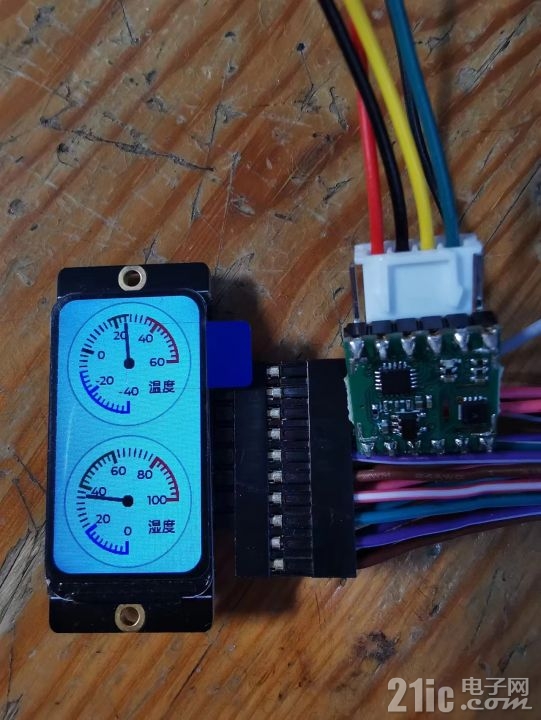
在室内环境的情况下,具体呈现结果:

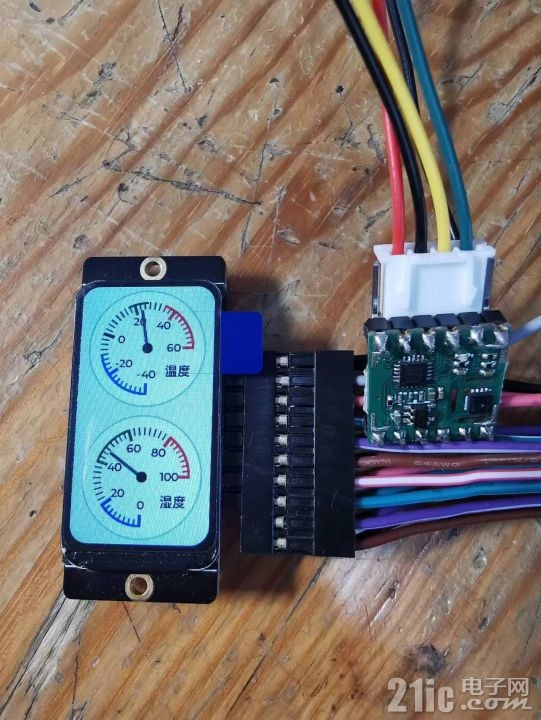
对着SHT30哈气后,湿度上升:

六、总结
感觉在NUCLEO-U5A5ZJ-Q开发板上进行相关的开发,真是的太方便了。
得益于良好的结构设计,以及Zephyr的支持,上诉温湿度信息仪表盘显示的效果非常的好。
后面会继续尝试,连接更多的传感器,制作更丰富的呈现界面。