本帖最后由 hbzjt2011 于 2025-7-23 16:00 编辑
#申请原创# #技术资源#@21小跑堂
前言在使用APM32F402R Micro-EVB开发板时,发现官方提供了基于FreeRTOS的工程示例。既然APM32F4这颗芯片性能不错,资源如此丰富,为什么不试试跑一下微软的ThreadX呢?本文记录了在APM32F4上运行ThreadX RTOS的完整过程,仅供参考。
1.关于ThreadX这个系统说到ThreadX,可能很多人没听过,但在某些领域它可是大名鼎鼎。这个系统最初是Express Logic公司开发的,后来被微软收购并开源了。 为什么说它厉害?主要是因为它的资质够硬: - 拿到了医疗器械的FDA认证
- 通过了汽车功能安全的最高等级ASIL D
- 满足航空级DO-178B标准
- 符合核电站IEC-61508安全要求
简单来说,就是那些对可靠性要求极高的场合都在用它。虽然我们平时开发可能用不到这么高的标准,但能在自己的板子上跑一下这样的系统,还是挺有意思的。 相关链接: https://github.com/eclipse-threadx/rtos-docs
2.准备工作 硬件环境APM32F402R Micro-EVB开发板,最高工作频率120Mhz,128KB Flash,32KB SRAM,资源还算充裕。 软件准备开发环境用的是Keil MDK,版本要求5.30以上。需要下载两个东西: 环境搭建思路
我的想法是以SDK里面的SysTick例程为基础,把ThreadX的代码集成进去。这样既能保留原有的硬件抽象层,又能快速验证ThreadX的功能。 动手实现代码结构整理首先把ThreadX的源码复制到SDK的中间件目录下,然后新建一个工程目录,把需要的文件都整理好。 主要涉及三个部分的代码: - ThreadX的内核代码(通用部分)
- Cortex-M4架构相关的移植代码
- 我们自己写的应用代码
ThreadX对Cortex-M4有专门的适配,需要在编译器里设置好头文件路径和一些特殊的编译选项。特别是汇编器,需要加上预处理器支持,不然编译会报错。
3. 具体步骤:
1. 首先将ThreadX 源码拷贝到 ..\APM32F402_403_SDK_V1.0.1\Middlewares 文件夹下

ThreadX源码目录结构:
- .
- ├── cmake # CMakelist files for building the project
- ├── common # Core ThreadX files
- ├── common_modules # Core ThreadX module files
- ├── common_smp # Core ThreadX SMP files
- ├── docs # Documentation supplements
- ├── ports # Architecture and compiler specific files. See below for directory breakdown
- │ ├── cortex_m7
- │ │ ├── iar # Example IAR compiler sample project
- │ │ │ ├── example build # IAR workspace and sample project files
- │ │ │ ├── inc # tx_port.h for this architecture
- │ │ │ └── src # Source files for this architecture
- │ │ ├── ac6 # Example ac6/Keil sample project
- │ │ ├── gnu # Example gnu sample project
- │ │ └── ...
- │ └── ...
- ├── ports_modules # Architecture and compiler specific files for threadX modules
- ├── ports_smp # Architecture and compiler specific files for threadX SMP
- ├── samples # demo_threadx.c
- └── utility # Test cases and utilities
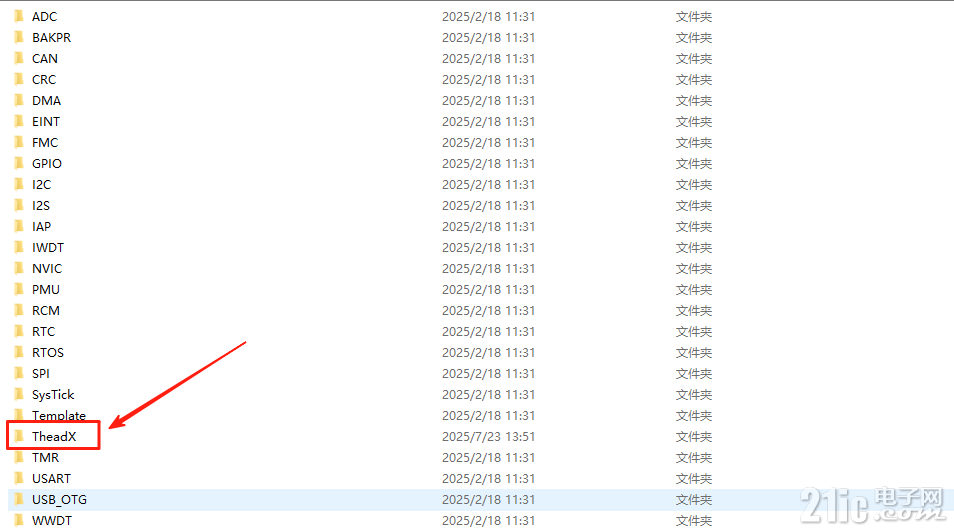
3. 拷贝ThreadX源码目录中APM32F402_403_SDK_V1.0.1\Middlewares\threadx-6.4.2_rel\ports\cortex_m4\ac6\example_build\sample_threadx文件夹下的tx_initialize_low_level.S 文件,到我们的工程目录源文件夹下APM32F402_403_SDK_V1.0.1\Examples\Board_APM32F402_Tiny\TheadX\ThreadX_APM32\Source:

4. 在工程目录中创建ThreadX/ports文件夹,并添加APM32F402_403_SDK_V1.0.1\Middlewares\threadx-6.4.2_rel\ports\cortex_m4\ac6\src目录下的所有.S文件以及工程源码目录下的tx_initialize_low_level.S文件到该文件夹下:

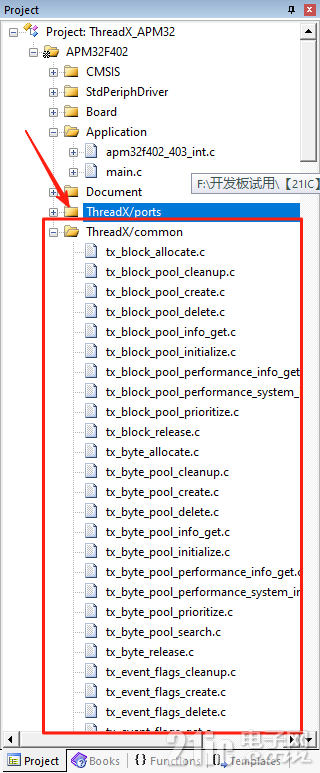
5. 在工程目录中创建ThreadX/common文件夹,并将ThreadX源码目录下的common文件夹下src文件全部添加到该文件夹中,此文件夹为ThreadX系统实现的核心源文件:
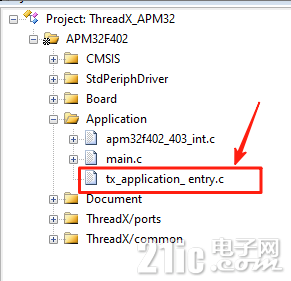
6. 在工程目录中的Application文件下夹创建tx_application_ entry.c文件,作为后续主程序入口:
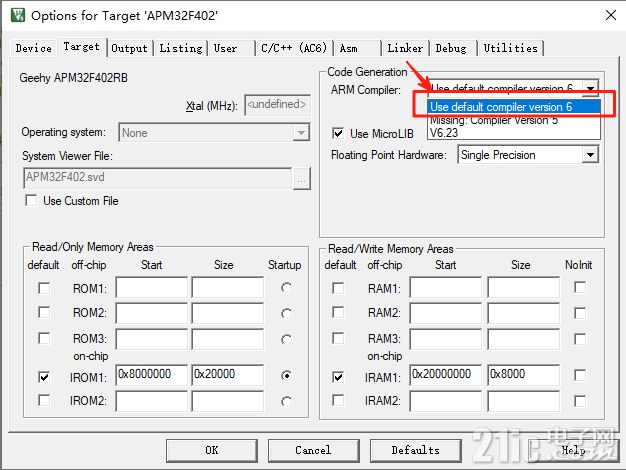
7. 更改默认编译器为AC6
8. 添加如下头文件目录:
- 1. "... \... \... \... \... \... \Middlewares\threadx-6.4.2_rel\ports\cortex_m4\ac6\inc"
- 2. "... \... \... \... \... \Middlewares\threadx-6.4.2_rel\common\inc"

9. 在Options->Asm下添加如下头文件目录。

10. 修改tx_initialize_low_level.s中的时钟、堆栈以及中断向量表设置:
- @/***************************************************************************
- [url=home.php?mod=space&uid=72445]@[/url] * Copyright (c) 2024 Microsoft Corporation
- [url=home.php?mod=space&uid=72445]@[/url] *
- @ * This program and the accompanying materials are made available under the
- @ * terms of the MIT License which is available at
- @ * https://opensource.org/licenses/MIT.
- @ *
- @ * SPDX-License-Identifier: MIT
- @ **************************************************************************/
- @
- @
- @/**************************************************************************/
- @/**************************************************************************/
- @/** */
- @/** ThreadX Component */
- @/** */
- @/** Initialize */
- @/** */
- @/**************************************************************************/
- @/**************************************************************************/
- @
- @
- .global _tx_thread_system_stack_ptr
- .global _tx_initialize_unused_memory
- .global _tx_timer_interrupt
- .global __main
- .global __tx_SVCallHandler
- .global __tx_PendSVHandler
- .global __tx_NMIHandler @ NMI
- .global __tx_BadHandler @ HardFault
- .global __tx_SVCallHandler @ SVCall
- .global __tx_DBGHandler @ Monitor
- .global __tx_PendSVHandler @ PendSV
- .global __tx_SysTickHandler @ SysTick
- .global __tx_IntHandler @ Int 0
-
- .extern __initial_sp
- .extern __Vectors
- .global vector_table
- vector_table = __Vectors
- @
- @
- SYSTEM_CLOCK = 16000000
- SYSTICK_CYCLES = ((SYSTEM_CLOCK / 100) -1)
- .text 32
- .align 4
- .syntax unified
- @/**************************************************************************/
- @/* */
- @/* FUNCTION RELEASE */
- @/* */
- @/* _tx_initialize_low_level Cortex-M4/AC6 */
- @/* 6.1 */
- @/* AUTHOR */
- @/* */
- @/* William E. Lamie, Microsoft Corporation */
- @/* */
- @/* DESCRIPTION */
- @/* */
- @/* This function is responsible for any low-level processor */
- @/* initialization, including setting up interrupt vectors, setting */
- @/* up a periodic timer interrupt source, saving the system stack */
- @/* pointer for use in ISR processing later, and finding the first */
- @/* available RAM memory address for tx_application_define. */
- @/* */
- @/* INPUT */
- @/* */
- @/* None */
- @/* */
- @/* OUTPUT */
- @/* */
- @/* None */
- @/* */
- @/* CALLS */
- @/* */
- @/* None */
- @/* */
- @/* CALLED BY */
- @/* */
- @/* _tx_initialize_kernel_enter ThreadX entry function */
- @/* */
- @/* RELEASE HISTORY */
- @/* */
- @/* DATE NAME DESCRIPTION */
- @/* */
- @/* 09-30-2020 William E. Lamie Initial Version 6.1 */
- @/* */
- @/**************************************************************************/
- [url=home.php?mod=space&uid=34493]@void[/url] _tx_initialize_low_level(VOID)
- @{
- .global _tx_initialize_low_level
- .thumb_func
- _tx_initialize_low_level:
- @
- @ /* Disable interrupts during ThreadX initialization. */
- @
- CPSID i
- @
- @ /* Set base of available memory to end of non-initialised RAM area. */
- @
- LDR r0, =_tx_initialize_unused_memory @ Build address of unused memory pointer
- LDR r1, =__initial_sp @ Build first free address
- ADD r1, r1, #4 @
- STR r1, [r0] @ Setup first unused memory pointer
- @
- @ /* Setup Vector Table Offset Register. */
- @
- MOV r0, #0xE000E000 @ Build address of NVIC registers
- LDR r1, =vector_table @ Pickup address of vector table
- STR r1, [r0, #0xD08] @ Set vector table address
- @
- @ /* Set system stack pointer from vector value. */
- @
- LDR r0, =_tx_thread_system_stack_ptr @ Build address of system stack pointer
- LDR r1, =vector_table @ Pickup address of vector table
- LDR r1, [r1] @ Pickup reset stack pointer
- STR r1, [r0] @ Save system stack pointer
- @
- @ /* Enable the cycle count register. */
- @
- LDR r0, =0xE0001000 @ Build address of DWT register
- LDR r1, [r0] @ Pickup the current value
- ORR r1, r1, #1 @ Set the CYCCNTENA bit
- STR r1, [r0] @ Enable the cycle count register
- @
- @ /* Configure SysTick for 100Hz clock, or 16384 cycles if no reference. */
- @
- MOV r0, #0xE000E000 @ Build address of NVIC registers
- LDR r1, =SYSTICK_CYCLES
- STR r1, [r0, #0x14] @ Setup SysTick Reload Value
- MOV r1, #0x7 @ Build SysTick Control Enable Value
- STR r1, [r0, #0x10] @ Setup SysTick Control
- @
- @ /* Configure handler priorities. */
- @
- LDR r1, =0x00000000 @ Rsrv, UsgF, BusF, MemM
- STR r1, [r0, #0xD18] @ Setup System Handlers 4-7 Priority Registers
- LDR r1, =0xFF000000 @ SVCl, Rsrv, Rsrv, Rsrv
- STR r1, [r0, #0xD1C] @ Setup System Handlers 8-11 Priority Registers
- @ Note: SVC must be lowest priority, which is 0xFF
- LDR r1, =0x40FF0000 @ SysT, PnSV, Rsrv, DbgM
- STR r1, [r0, #0xD20] @ Setup System Handlers 12-15 Priority Registers
- @ Note: PnSV must be lowest priority, which is 0xFF
- @
- @ /* Return to caller. */
- @
- BX lr
- @}
- @
- @/* Define shells for each of the unused vectors. */
- @
- .global __tx_BadHandler
- .thumb_func
- __tx_BadHandler:
- B __tx_BadHandler
- @ /* added to catch the hardfault */
- .global __tx_HardfaultHandler
- .thumb_func
- __tx_HardfaultHandler:
- B __tx_HardfaultHandler
- @ /* added to catch the SVC */
- .global __tx_SVCallHandler
- .thumb_func
- __tx_SVCallHandler:
- B __tx_SVCallHandler
- @ /* Generic interrupt handler template */
- .global __tx_IntHandler
- .thumb_func
- __tx_IntHandler:
- @ VOID InterruptHandler (VOID)
- @ {
- PUSH {r0, lr}
- #ifdef TX_ENABLE_EXECUTION_CHANGE_NOTIFY
- BL _tx_execution_isr_enter @ Call the ISR enter function
- #endif
- @ /* Do interrupt handler work here */
- @ /* BL <your C Function>.... */
- #ifdef TX_ENABLE_EXECUTION_CHANGE_NOTIFY
- BL _tx_execution_isr_exit @ Call the ISR exit function
- #endif
- POP {r0, lr}
- BX LR
- @ }
- @ /* System Tick timer interrupt handler */
- .global __tx_SysTickHandler
- .global SysTick_Handler
- .thumb_func
- __tx_SysTickHandler:
- .thumb_func
- SysTick_Handler:
- @ VOID TimerInterruptHandler (VOID)
- @ {
- @
- PUSH {r0, lr}
- #ifdef TX_ENABLE_EXECUTION_CHANGE_NOTIFY
- BL _tx_execution_isr_enter @ Call the ISR enter function
- #endif
- BL _tx_timer_interrupt
- #ifdef TX_ENABLE_EXECUTION_CHANGE_NOTIFY
- BL _tx_execution_isr_exit @ Call the ISR exit function
- #endif
- POP {r0, lr}
- BX LR
- @ }
- @ /* NMI, DBG handlers */
- .global __tx_NMIHandler
- .thumb_func
- __tx_NMIHandler:
- B __tx_NMIHandler
- .global __tx_DBGHandler
- .thumb_func
- __tx_DBGHandler:
- B __tx_DBGHandler
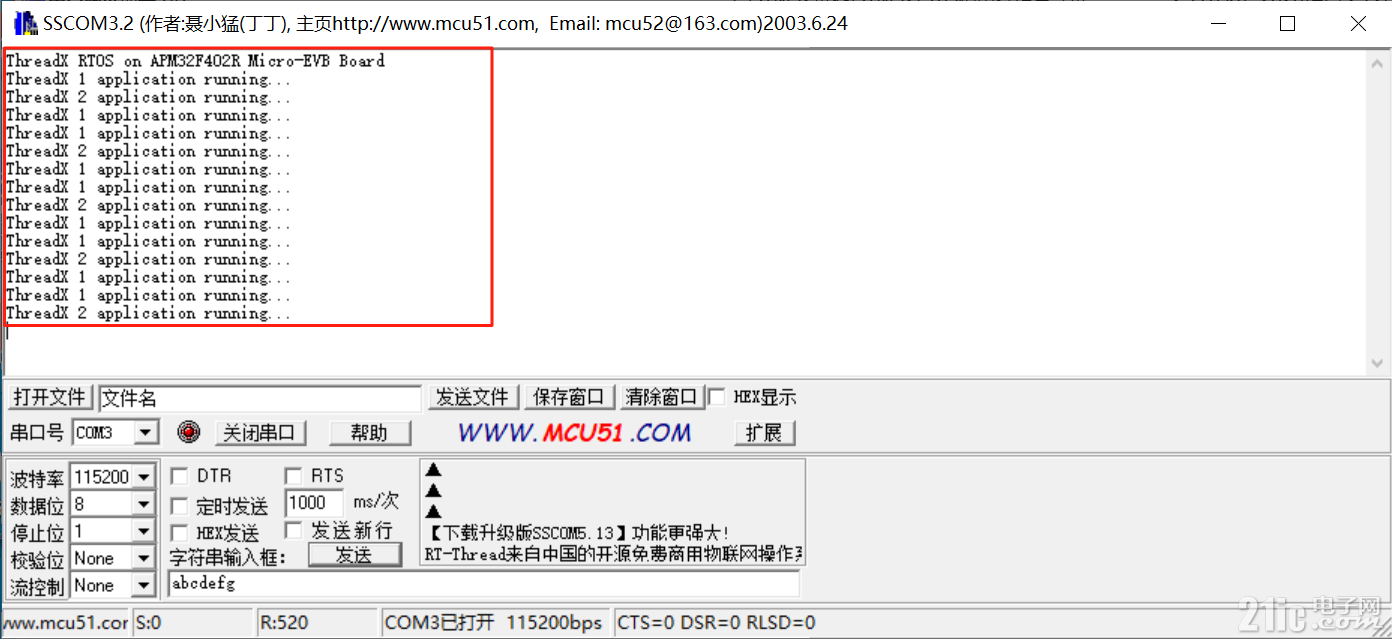
为了验证系统工作正常,我写了两个简单的任务: - 第一个任务控制LED2,每0.5秒闪烁一次
- 第二个任务控制LED3,每1秒闪烁一次
- 两个任务都会通过串口输出运行状态
代码实现上,ThreadX的API还是比较直观的:
- /* Includes ***************************************************************/
- #include "main.h"
- #include "board_apm32f402_403_tiny.h"
- #include <stdio.h>
- #include "tx_api.h"
- #define TX_APPLICATION1_PRIO 2
- #define TX_APPLICATION1_STACK_SIZE 1024
- static TX_THREAD tx_application1;
- uint8_t tx_application1_stack[TX_APPLICATION1_STACK_SIZE];
- #define TX_APPLICATION2_PRIO 3
- #define TX_APPLICATION2_STACK_SIZE 1024
- static TX_THREAD tx_application2;
- uint8_t tx_application2_stack[TX_APPLICATION2_STACK_SIZE];
- void my_tx_application1_entry(ULONG thread_input)
- {
- /* Enter into a forever loop. */
- while(1)
- {
- printf("ThreadX 1 application running...\r\n");
- BOARD_LED_Toggle(LED2);
- /* Sleep for 1500 tick. */
- tx_thread_sleep(500);
- }
- }
- void my_tx_application2_entry(ULONG thread_input)
- {
- /* Enter into a forever loop. */
- while(1)
- {
- printf("ThreadX 2 application running...\r\n");
- BOARD_LED_Toggle(LED3);
- /* Sleep for 1000 tick. */
- tx_thread_sleep(1000);
- }
- }
- void tx_application_define(void *first_unused_memory)
- {
- /* Create thread */
- tx_thread_create(&tx_application1, "thread 1", my_tx_application1_entry, 0, &tx_application1_stack[0], TX_APPLICATION1_STACK_SIZE, TX_APPLICATION1_PRIO, TX_APPLICATION1_PRIO, TX_NO_TIME_SLICE, TX_AUTO_START);
- tx_thread_create(&tx_application2, "thread 2", my_tx_application2_entry, 0, &tx_application2_stack[0], TX_APPLICATION2_STACK_SIZE, TX_APPLICATION2_PRIO, TX_APPLICATION2_PRIO, TX_NO_TIME_SLICE, TX_AUTO_START);
- }
- void _tx_thread_stack_error_handler(void)
- {
- while(1);
- }
13. 编译下载程序:

14. 查看串口输出及LED灯的变化:
注意事项:
中断冲突处理ThreadX需要接管几个系统级中断,特别是PendSV和SysTick。需要在APM32的中断处理文件里把这两个函数注释掉,避免重复定义。 一些感受技术层面ThreadX的代码质量确实不错,注释详细,架构清晰。虽然移植过程中遇到了一些细节问题,但总体来说还是比较顺利的。 系统的实时性表现也很好,任务切换开销很小,对于大多数嵌入式应用来说完全够用。 实用价值对于一般的项目,ThreadX可能有点"大材小用"了,毕竟FreeRTOS已经能满足大部分需求。但如果你的项目对可靠性要求特别高,或者需要通过某些安全认证,ThreadX确实是个不错的选择。 另外,学习ThreadX也有助于理解高质量RTOS的设计思路,对提升技术水平还是有帮助的。 后续计划目前只是跑通了基本功能,后面还可以尝试: - 集成ThreadX的网络协议栈
- 测试一下文件系统组件
- 研究一下它的调试和分析工具
- 看看能不能移植到其他芯片平台
小结在APM32F4上跑ThreadX整体来说是可行的,虽然移植过程需要一些底层知识,但最终效果还是令人满意的。对于想要体验企业级RTOS的朋友,不妨动手试试。
代码我已经整理好了,有需要的朋友可以留言交流。希望这个分享对大家有所帮助!
|