本帖最后由 sytuxww 于 2010-6-26 15:28 编辑
(1) Nios ps2 IP核的加入
通过下载Altera公司提供的基于DE1的IP核,将其加入到SOPC中编译生成硬件模块。
注意ps2核必须连接50MHz的时钟。
(2)在顶层模块加入如下代码

PS2_CLK和PS2_DAT配置到PIN_H15和PIN_J14上面,编译下载硬体程序到FPGA中。
(3)在NIOS2 IDE中初始化PS2鼠标设备
必须包含如下几个头文件
#include "altera_avalon_pio_regs.h"
#include "altera_up_ps2_keyboard.h"
#include "altera_up_ps2_mouse.h"
int PS2_Init()
{
int status;
int ErrorTime;
ps2 = alt_up_ps2_open_dev("/dev/ps2");
alt_up_ps2_init(ps2);
alt_up_ps2_clear_fifo(ps2);
if (ps2->device_type == PS2_MOUSE)
{
printf("Mouse...\n");
ErrorTime = 0;
status = alt_up_ps2_write_data_byte_with_ack(ps2,0xf3);
if(status == 0)
{
status = alt_up_ps2_write_data_byte_with_ack(ps2,0x0A);
}else{
return (0);
}
do
{
alt_up_ps2_mouse_reset(ps2);
status = alt_up_ps2_write_data_byte_with_ack(ps2, 0xf4);
ErrorTime++;
}while ((status != 0) && (ErrorTime < 10));
if(ErrorTime >= 10){
printf("Enable data reporting from the mouse Failed!");
return (0);
}
else if (status == 0){
alt_up_ps2_mouse_set_mode(ps2,MOUSE_STREAM_MODE);
alt_irq_register( PS2_IRQ, 0,MOUSE_ISR );
alt_up_ps2_enable_read_interrupt(ps2);
return (1);
}
}
return (0);
}
此函数中初始化了ps2设备并且根据其回应的字符确定连接的设备为鼠标不是键盘,当设备初始化结束后需alt_irq_register( PS2_IRQ, 0,MOUSE_ISR );alt_up_ps2_enable_read_interrupt(ps2);这两个函数为鼠标中断服务函数的注册和使能,当这两个函数执行正常之后就可以正常使用鼠标了。
(4)中断服务函数的实现
//PS2鼠标中断服务程序
static void MOUSE_ISR(void* context, alt_u32 id)
{
char Data;
alt_up_ps2_read_data_byte(ps2, &Data);
GUI_MOUSE_DRIVER_PS2_OnRx(Data);
}
alt_up_ps2_read_data_byte(ps2, &Data);
这句代码实现从IP核读取一个字节的数据。
GUI_MOUSE_DRIVER_PS2_OnRx(Data);
这句是ucGUI内核提供的一个ps2鼠标处理内核函数,其主要代码为
void GUI_MOUSE_DRIVER_PS2_OnRx(unsigned char Data) {
if (!_NumBytesInBuffer) {
/* check for start frame */
if ((Data & 0x0c) == 0x08) {
_abInBuffer[0] = Data;
_NumBytesInBuffer++;
}
} else {
_abInBuffer[_NumBytesInBuffer] = Data;
_NumBytesInBuffer++;
if (_NumBytesInBuffer >= 3) {
_EvaPacket();
_NumBytesInBuffer = 0;
}
}
}
主要完成鼠标数据包的存取和解释。
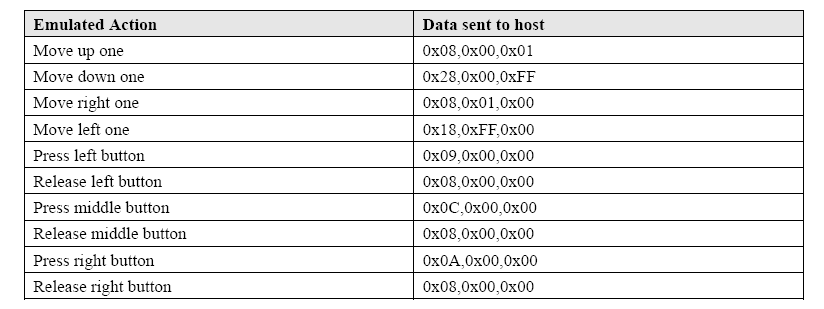
鼠标位移数据 包

当测试到接受的数据Bit3为1则为有效数据包,存取3位数据,调用_EvaPacket();解释其代表的含义。
static void _EvaPacket(void) {
char a;
GUI_PID_STATE State;
_Buttons = _abInBuffer[0] & 0x03;
a = _abInBuffer[1];
/* test x move sign. */
if(_abInBuffer[0] & 0x10) {
a = ~a + 1;
_ScreenX -= a;
} /* direction is negative, move left */
else {
_ScreenX += a;
}
a = _abInBuffer[2];
/* test y move sign. */
if(_abInBuffer[0] & 0x20) {
a = ~a + 1;
_ScreenY += a;
} /* direction is negative, move down */ else {
_ScreenY -= a;
}
/* check min/max positions */
if (_ScreenX < 0) {
_ScreenX = 0;
} else if (_ScreenX > LCD_XSIZE-1) {
_ScreenX = LCD_XSIZE-1;
} if (_ScreenY < 0) {
_ScreenY = 0;
} else if (_ScreenY > LCD_YSIZE-1) {
_ScreenY = LCD_YSIZE-1;
}
/* signal new mouse data */
State.x = _ScreenX;
State.y = _ScreenY;
State.Pressed = _Buttons;
GUI_MOUSE_StoreState(&State);
#if GUI_SUPPORT_CURSOR
GUI_CURSOR_SetPosition(_ScreenX,_ScreenY);
#endif
}
由于数据表中的位移使用的是9位二进制补码来表示的当其位移为负的时候必须将其转换为原码来操作。 “a = ~a + 1;”将补码转换为原码了。
当解释结束后调用 GUI_MOUSE_StoreState(&State);将鼠标的状态输入到GUI内核中来执行对应操作。
当需要显示光标的时候必须将其最新状态更新到屏幕上去。
#if GUI_SUPPORT_CURSOR
GUI_CURSOR_SetPosition(_ScreenX,_ScreenY);
#endif
(5)光标的显示
在GUIConf.h中设置
#define GUI_SUPPORT_CURSOR 1
在main()函数中
GUI_CURSOR_Select(&GUI_CursorArrowS);
光标样 式的选择

GUI_CURSOR_SetPosition(0,0);光标位置的设置
GUI_CURSOR_Show();显示光标
在PS中断服务函数中
当需要显示光标的时候必须将其最新状态更新到屏幕上去。
#if GUI_SUPPORT_CURSOR
GUI_CURSOR_SetPosition(_ScreenX,_ScreenY);
#endif
(6)注意,使用鼠标之前一定得调用PS2_Init()函数。
到这里ucGUI已经可以正常显示鼠标光标和执行鼠标指令了。 |
|