https://bbs.21ic.com/icview-3068392-1-1.html
书接上回,上回咱们从0开始建立个新工程,并完成了点灯操作。
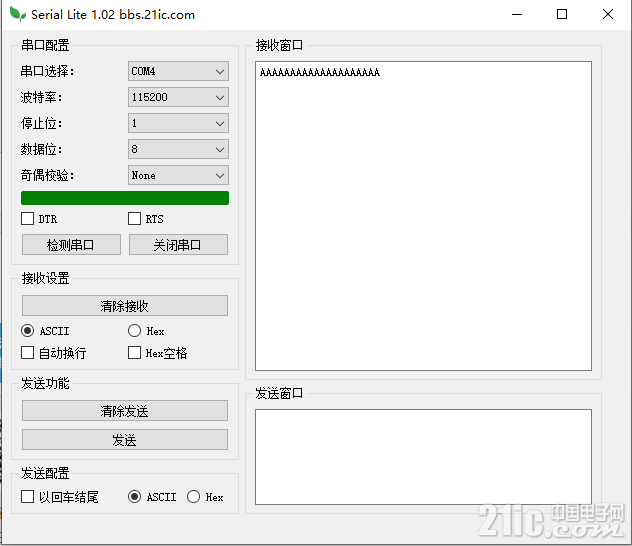
接下来咱们在原有基础上怎么串口打印功能。

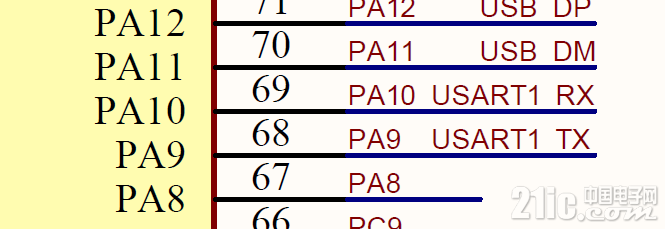
由原理图可知,串口在PA10和PA9上,我们如果要打印消息到串口,则要使用PA9,记住了USART1.
接下来配置端口的顺序是使能端口时钟,使能USART1时钟,配置端口IO模式,调用外设标准函数配置串口参数。。。
- //串口初始化,根据原理图使用的是USART1,PA9为TX,PA10为RX
- void UART1_Init(uint32_t bound)
- {
- GPIO_InitType GPIO_InitStructure;
- USART_InitType USART_InitStructure;
-
- RCC_APB2PeriphClockCmd(RCC_APB2PERIPH_GPIOA,ENABLE);
- RCC_APB2PeriphClockCmd(RCC_APB2PERIPH_USART1,ENABLE);
- /* Configure the UART1 TX pin */
- GPIO_StructInit(&GPIO_InitStructure);
- GPIO_InitStructure.GPIO_Pins = GPIO_Pins_9;
- GPIO_InitStructure.GPIO_MaxSpeed = GPIO_MaxSpeed_50MHz;
- GPIO_InitStructure.GPIO_Mode = GPIO_Mode_AF_PP;
- GPIO_Init(GPIOA, &GPIO_InitStructure);
-
- /*Configure UART param*/
- USART_StructInit(&USART_InitStructure);
- USART_InitStructure.USART_BaudRate = bound;
- USART_InitStructure.USART_WordLength = USART_WordLength_8b;
- USART_InitStructure.USART_StopBits = USART_StopBits_1;
- USART_InitStructure.USART_Parity = USART_Parity_No;
- USART_InitStructure.USART_HardwareFlowControl = USART_HardwareFlowControl_None;
- USART_InitStructure.USART_Mode = USART_Mode_Rx | USART_Mode_Tx;
- USART_Init(USART1, &USART_InitStructure);
- USART_INTConfig(USART1, USART_INT_RDNE, ENABLE);
- USART_Cmd(USART1, ENABLE);
- }
- USART_SendData(USART1,'A');
- #include "at32f4xx_gpio.h"
- /*delay variable*/
- static __IO uint32_t fac_us;
- static __IO uint32_t fac_ms;
- /*delay macros*/
- #define STEP_DELAY_MS 50
- void Delay_init()
- {
- /*Config Systick*/
- SysTick_CLKSourceConfig(SysTick_CLKSource_HCLK);
- fac_us = SystemCoreClock / (1000000U);
- fac_ms = fac_us * (1000U);
- }
- void Delay_ms(u16 nms)
- {
- u32 temp;
- while(nms)
- {
- if(nms > STEP_DELAY_MS)
- {
- SysTick->LOAD = (u32)(STEP_DELAY_MS * fac_ms);
- nms -= STEP_DELAY_MS;
- }
- else
- {
- SysTick->LOAD = (u32)(nms * fac_ms);
- nms = 0;
- }
- SysTick->VAL = 0x00;
- SysTick->CTRL |= SysTick_CTRL_ENABLE_Msk;
- do
- {
- temp = SysTick->CTRL;
- }while( (temp & 0x01) && !(temp & (1<<16)) );
- SysTick->CTRL &= ~SysTick_CTRL_ENABLE_Msk;
- SysTick->VAL = 0X00;
- }
- }
- //串口初始化,根据原理图使用的是USART1,PA9为TX,PA10为RX
- void UART1_Init(uint32_t bound)
- {
- GPIO_InitType GPIO_InitStructure;
- USART_InitType USART_InitStructure;
-
- RCC_APB2PeriphClockCmd(RCC_APB2PERIPH_GPIOA,ENABLE);
- RCC_APB2PeriphClockCmd(RCC_APB2PERIPH_USART1,ENABLE);
- /* Configure the UART1 TX pin */
- GPIO_StructInit(&GPIO_InitStructure);
- GPIO_InitStructure.GPIO_Pins = GPIO_Pins_9;
- GPIO_InitStructure.GPIO_MaxSpeed = GPIO_MaxSpeed_50MHz;
- GPIO_InitStructure.GPIO_Mode = GPIO_Mode_AF_PP;
- GPIO_Init(GPIOA, &GPIO_InitStructure);
-
- /*Configure UART param*/
- USART_StructInit(&USART_InitStructure);
- USART_InitStructure.USART_BaudRate = bound;
- USART_InitStructure.USART_WordLength = USART_WordLength_8b;
- USART_InitStructure.USART_StopBits = USART_StopBits_1;
- USART_InitStructure.USART_Parity = USART_Parity_No;
- USART_InitStructure.USART_HardwareFlowControl = USART_HardwareFlowControl_None;
- USART_InitStructure.USART_Mode = USART_Mode_Rx | USART_Mode_Tx;
- USART_Init(USART1, &USART_InitStructure);
- USART_INTConfig(USART1, USART_INT_RDNE, ENABLE);
- USART_Cmd(USART1, ENABLE);
- }
- int main(void)
- {
- //LED2管脚初始化
- GPIO_InitType GPIO_InitStructure;
- RCC_APB2PeriphClockCmd(RCC_APB2PERIPH_GPIOD, ENABLE);
- GPIO_StructInit(&GPIO_InitStructure);
- GPIO_InitStructure.GPIO_Pins =GPIO_Pins_13;
- GPIO_InitStructure.GPIO_Mode = GPIO_Mode_OUT_PP;
- GPIO_InitStructure.GPIO_MaxSpeed = GPIO_MaxSpeed_50MHz;
- GPIO_Init(GPIOD,&GPIO_InitStructure);
-
- Delay_init();
- UART1_Init(115200);
-
- while(1)
- {
- GPIO_SetBits(GPIOD,GPIO_Pins_13);
- Delay_ms(200);
- GPIO_ResetBits(GPIOD,GPIO_Pins_13);
- Delay_ms(200);
- USART_SendData(USART1,'A');
- }
-
- }

|