|
[color=rgba(0, 0, 0, 0.87)]先进入源码目录,打开 Git Bash,如下图操作: [color=rgba(0, 0, 0, 0.87)] [color=var(--md-typeset-a-color)]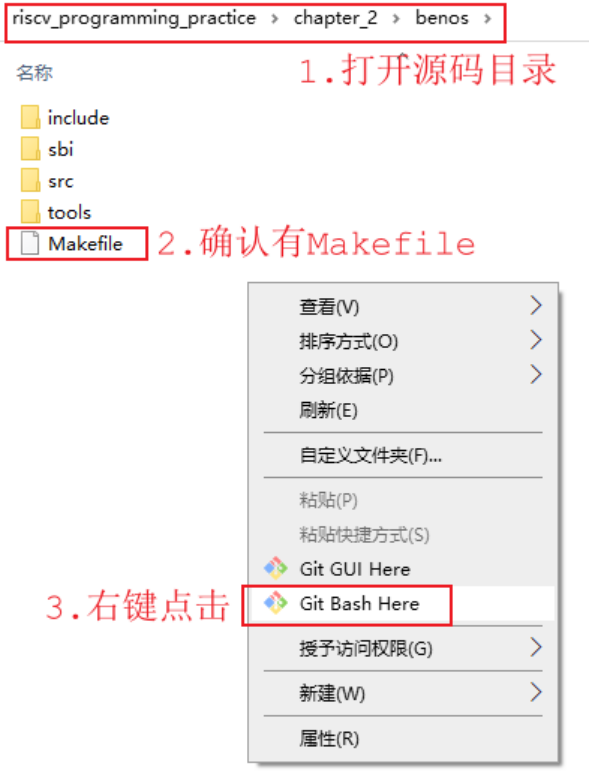 [color=rgba(0, 0, 0, 0.87)]然后在 Git Bash 中执行 make 命令,可以生成 benos_payload.bin 文件,如下图所示: [color=rgba(0, 0, 0, 0.87)] [color=var(--md-typeset-a-color)]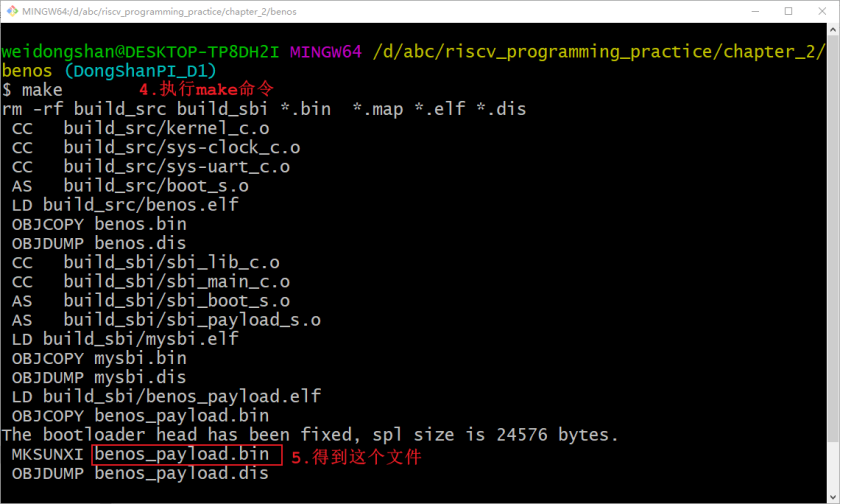 [color=rgba(0, 0, 0, 0.87)]使用 2 条 USB 线,分别连接开发板的 3.OTG烧录接口 、 4.调试&串口接口 ,使用串口工具打开串口,波特率设为 115200 , 8 个数据位,1 个停止位,不使用流量控制。 [color=rgba(0, 0, 0, 0.87)]烧录方法如下: [color=rgba(0, 0, 0, 0.87)]① 先让开发板进入烧录模式: [color=rgba(0, 0, 0, 0.87)]方法为:先按住 2.烧录模式按键 不松开,然后按下、松开 5.系统复位按键 ,最后松开 2.烧录模式按键 。 [color=rgba(0, 0, 0, 0.87)]② 然后在 Git Bash 开执行 make burn 命令 [color=rgba(0, 0, 0, 0.87)]如下图所示: [color=rgba(0, 0, 0, 0.87)] [color=var(--md-typeset-a-color)] [color=rgba(0, 0, 0, 0.87)]烧写成功后,按下、松开 5.系统复位按键 即可启动程序,可以在串口看到输出信息: [color=rgba(0, 0, 0, 0.87)] [color=var(--md-typeset-a-color)]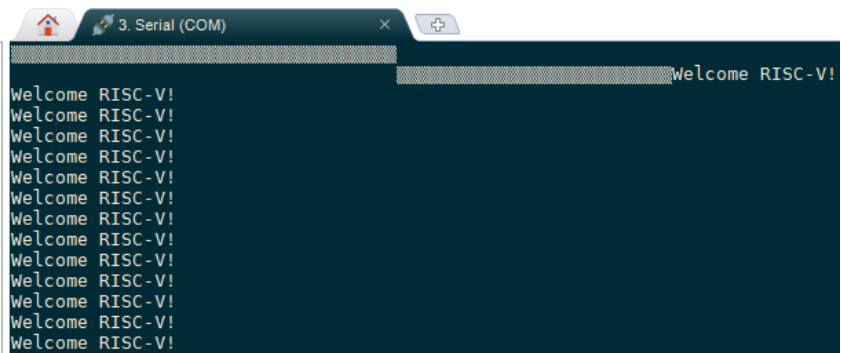 [color=rgba(0, 0, 0, 0.87)]使用 GDB 调试时,涉及两个软件: [color=rgba(0, 0, 0, 0.87)]① 在 Git Bash 中运行的 riscv64-unknown-elf-gdb :它发出各类调试命令,比如连接调试服务软件 (T-HeadDebugServer) 、单步运行、查看变量等等 [color=rgba(0, 0, 0, 0.87)]② T-HeadDebugServer :它就是“调试服务软件”,负责接收、处理各类调试命令 [color=rgba(0, 0, 0, 0.87)]常见的命令如下表所示: [color=rgba(0, 0, 0, 0.87)]命令 简写形式 说明
target连接调试服务器,比如: target remote 127.0.0.1:1025
runr运行程序
continuec、cont继续运行
breakb设置断点,比如: b sbi_main.c:121 b sbi_main b *0x20000
deleted删除断点
disabledis禁用断点
info breakpointsinfo b显示断点信息
nextn执行下一行
nextini执行下一行(以汇编代码为单位)
steps一次执行一行,包括函数内部
setpisi执行下一行
listl显示函数或行
printp显示表达式,比如: print a print $pc // 打印寄存器 print *0x20000//打印内存 print /x a // 16进制打印
x显示内存内容,比如: x 0x20000 x /x 0x20000 //16进制
info registersinfor r打印所有寄存器的值
set设置变量,比如: set var a=1 set *(unsigned int *)0x28000 = 0x55555555 set var $pc=0x22000
finish运行到函数结束
helph显示帮助一览
backtracebt、where显示 backtrace
symbol-file加载符号表,比如 symbol-file benos.elf
2.2.2 benos_payload 程序组成[color=rgba(0, 0, 0, 0.87)]《RISC-V体系结构编程与实践》中的代码分为两部分: [color=rgba(0, 0, 0, 0.87)]① mysbi.elf:运行于 M 模式的底层软件,提供各种系统服务 [color=rgba(0, 0, 0, 0.87)]② benos.elf:运行于 S 模式的应用软件 [color=rgba(0, 0, 0, 0.87)]benos_payload 是这两部分程序的组合: 2.2.2 benos_payload 程序组成[color=rgba(0, 0, 0, 0.87)]《RISC-V体系结构编程与实践》中的代码分为两部分: [color=rgba(0, 0, 0, 0.87)]① mysbi.elf:运行于 M 模式的底层软件,提供各种系统服务 [color=rgba(0, 0, 0, 0.87)]② benos.elf:运行于 S 模式的应用软件 [color=rgba(0, 0, 0, 0.87)]benos_payload 是这两部分程序的组合: code" style="box-sizing: inherit; -webkit-tap-highlight-color: transparent; font-size: inherit; font-family: inherit; background-image: initial; background-position: initial; background-size: initial; background-repeat: initial; background-attachment: initial; background-origin: initial; background-clip: initial; border-width: 0px; border-style: initial; border-color: initial; position: absolute; top: 0.5em; right: 0.5em; z-index: 1; width: 1.5em; height: 1.5em; border-radius: 0.1rem; outline: none; outline-offset: 0.1rem; cursor: pointer; transition: color 0.25s ease 0s;">benos_payload.elf = mysbi.elf + benos.elfbenos_payload.bin = mysbi.bin + benos.bin[color=rgba(0, 0, 0, 0.87)]烧写、运行 benos_payload.bin 时,会先运行 mysbi 程序, mysbi 再启动 benos 。调试 benos_payload.elf 时,我们可以先调试 mysbi ,等 benos 启动后再调试 benos。 2.2.3 调试准备工作[color=rgba(0, 0, 0, 0.87)]首先,启动 CKLink 的调试功能,方法为:把下图中蓝色箭头所指的拨码开关上的薄膜撕开,把所有拨码开关拨向左边(USB接口那边): [color=rgba(0, 0, 0, 0.87)] [color=var(--md-typeset-a-color)]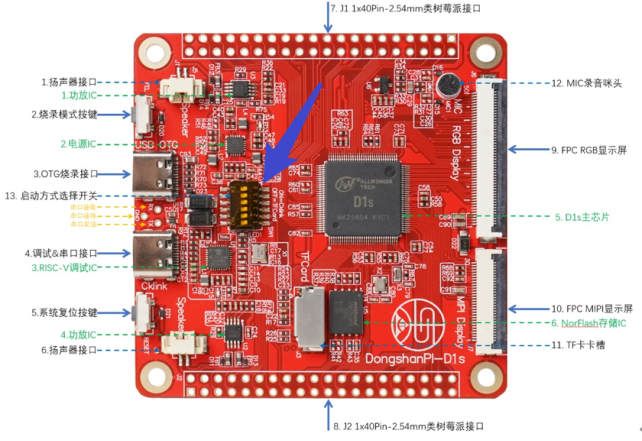 [color=rgba(0, 0, 0, 0.87)]然后,启动调试服务软件 T-HeadDebugServer ,它会自动检测到芯片,如下图所示: [color=rgba(0, 0, 0, 0.87)] [color=var(--md-typeset-a-color)]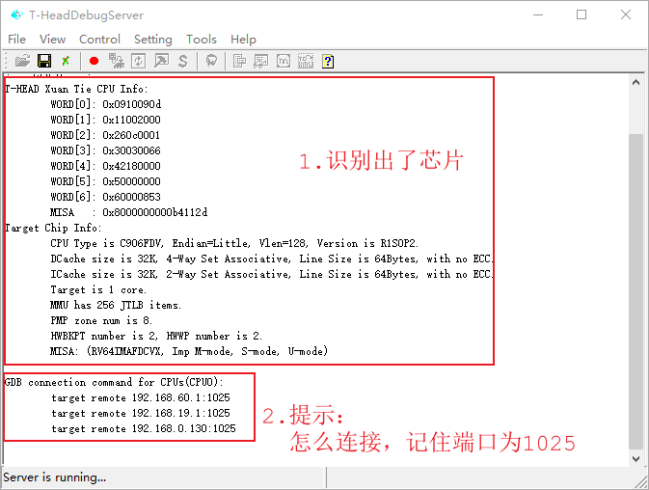 [color=rgba(0, 0, 0, 0.87)]如果没有上图所示信息,有多种可能: [color=rgba(0, 0, 0, 0.87)]① 没有自动识别: [color=rgba(0, 0, 0, 0.87)]可以手动识别,如下图所示: [color=rgba(0, 0, 0, 0.87)] [color=var(--md-typeset-a-color)] [color=rgba(0, 0, 0, 0.87)]② 板子上的程序有 Bug ,导致板子死机了:可以让板子先进入烧录模式,再按照步骤①操作 [color=rgba(0, 0, 0, 0.87)]③ 提示 1025 端口被占用:运行任务管理器,把所有 T-HeadDebugServer 杀掉,再重新运行 T-HeadDebugServer [color=rgba(0, 0, 0, 0.87)]当 T-HeadDebugServer 识别出芯片后,就可以调试程序了,有 2 种方式: [color=rgba(0, 0, 0, 0.87)]① 使用命令行模式调试 [color=rgba(0, 0, 0, 0.87)]② 使用 TUI 模式调试 2.2.4 命令行调试示例[color=rgba(0, 0, 0, 0.87)]当 T-HeadDebugServer 识别出芯片后,就可以在 Git Bash 里执行 riscv64-unknown-elf-gdb benos_payload.elf 来调试程序了。 [color=rgba(0, 0, 0, 0.87)]示例如下: code" style="box-sizing: inherit; -webkit-tap-highlight-color: transparent; font-size: inherit; font-family: inherit; background-image: initial; background-position: initial; background-size: initial; background-repeat: initial; background-attachment: initial; background-origin: initial; background-clip: initial; border-width: 0px; border-style: initial; border-color: initial; position: absolute; top: 0.5em; right: 0.5em; z-index: 1; width: 1.5em; height: 1.5em; border-radius: 0.1rem; outline: none; outline-offset: 0.1rem; cursor: pointer; transition: color 0.25s ease 0s;">weidongshan@DESKTOP-TP8DH2I MINGW64 /d/abc/riscv_programming_practice/chapter_2/benos (DongShanPI_D1)$ riscv64-unknown-elf-gdb benos_payload.elfReading symbols from benos_payload.elf...(gdb) target remote 127.0.0.1:1025 // 连接调试服务软件Remote debugging using 127.0.0.1:10250x000000000000a22a in ?? ()(gdb) load // 加载benos_payload.elfLoading section .text.boot, size 0x44 lma 0x20000 section progress: 100.0%, total progress: 0.38%Loading section .text, size 0x538 lma 0x20044 section progress: 100.0%, total progress: 7.81%Loading section .rodata, size 0xc0 lma 0x2057c section progress: 100.0%, total progress: 8.88%Loading section .data, size 0x1000 lma 0x21000 section progress: 100.0%, total progress: 31.66%Loading section .payload, size 0x3000 lma 0x22000 section progress: 100.0%, total progress: 100.00%Start address 0x0000000000020000, load size 17980Transfer rate: 209 KB/sec, 1997 bytes/write.(gdb) x /x 0x20000 // 检查0x20000是否被正确写入,// 我们调试程序时可能因为上次的死机导致无法load// 这时可以让板子进入烧录模式,再重新连接、重新加载0x20000 <text_begin>: 0x0300006f(gdb) b sbi_main // 设置断点为sbi_main函数Breakpoint 1 at 0x204bc: file sbi/sbi_main.c, line 80.(gdb) c // 执行Continuing.Breakpoint 1, sbi_main () at sbi/sbi_main.c:8080 sbi_set_pmp(0, 0, -1UL, PMP_RWX);(gdb) n // 下一步84 val = read_csr(mstatus);(gdb) b sbi_main.c:102 // 设置断点为sbi_main.c的102行Breakpoint 2 at 0x20564: file sbi/sbi_main.c, line 102.(gdb) info b // 查看所有断点Num Type Disp Enb Address What1 breakpoint keep y 0x00000000000204bc in sbi_main at sbi/sbi_main.c:80 breakpoint already hit 1 time2 breakpoint keep y 0x0000000000020564 in sbi_main at sbi/sbi_main.c:102(gdb) i b // 查看所有断点,简写的命令Num Type Disp Enb Address What1 breakpoint keep y 0x00000000000204bc in sbi_main at sbi/sbi_main.c:80 breakpoint already hit 1 time2 breakpoint keep y 0x0000000000020564 in sbi_main at sbi/sbi_main.c:102(gdb) c // 继续执行Continuing.Breakpoint 2, sbi_main () at sbi/sbi_main.c:102 // 碰到断点了// 执行完下一句代码就会跳到benos程序102 asm volatile("mret");(gdb) si // 单步执行并进入函数,每次执行一条汇编语句0x0000000000022000 in payload_bin () // 现在要执行另一个程序benos了(gdb) symbol-file benos.elf // 读取benos.elf的符号表,否则你调试时无法知道函数、代码等信息Load new symbol table from "benos.elf"? (y or n) [answered Y; input not from terminal]Reading symbols from benos.elf...Error in re-setting breakpoint 1: Function "sbi_main" not defined.Error in re-setting breakpoint 2: No source file named sbi_main.c.(gdb) si // 单步执行并进入函数,每次执行一条汇编语句9 la sp, stacks_start(gdb) b kernel_main // 设置断点为kernel_main函数Breakpoint 3 at 0x22020: file src/kernel.c, line 6.(gdb) c // 继续执行Continuing.Breakpoint 3, kernel_main () at src/kernel.c:66 sys_clock_init();(gdb) i r // 列出所有寄存器的值ra 0x204d0 0x204d0sp 0x24ff0 0x24ff0gp 0x0 0x0tp 0x0 0x0t0 0x1000 4096t1 0xfffffffffffff000 -4096t2 0x109 265fp 0xa00000900 0xa00000900s1 0x0 0a0 0x0 0a1 0x1f 31a2 0xffffffffffffffff -1a3 0x0 0a4 0xa00000100 42949673216a5 0x0 0a6 0x80 128a7 0x1c0 448s2 0x375bff17 928775959s3 0xff32dec 267595244s4 0x2eebeffb 787214331s5 0xffffffffffdf9ffd -2121731s6 0x355077ff 894466047s7 0xffffffffef7eeee9 -276893975s8 0x27034 159796s9 0xffffffffe6376ff3 -432574477s10 0xffffffffb9d37bfc -1177322500s11 0x78b47e70 2025094768t3 0x1 1t4 0xefe8 61416t5 0x8001 32769t6 0x0 0pc 0x22020 0x22020 <kernel_main+8>(gdb) l // 列出代码1 #include "clock.h"2 #include "uart.h"34 void kernel_main(void)5 {6 sys_clock_init();7 uart_init();89 while (1) {10 uart_send_string("Welcome RISC-V!\r\n");(gdb) l11 ;12 }13 }(gdb) c // 继续执行Continuing.Program received signal SIGINT, Interrupt. // 按Ctrl+C停止程序read32 (addr=38797436) at include/io.h:2323 }(gdb) quit // 退出调试[color=rgba(0, 0, 0, 0.87)]上述调试过程中,用到的命令都有注释,摘抄如下: code" style="box-sizing: inherit; -webkit-tap-highlight-color: transparent; font-size: inherit; font-family: inherit; background-image: initial; background-position: initial; background-size: initial; background-repeat: initial; background-attachment: initial; background-origin: initial; background-clip: initial; border-width: 0px; border-style: initial; border-color: initial; position: absolute; top: 0.5em; right: 0.5em; z-index: 1; width: 1.5em; height: 1.5em; border-radius: 0.1rem; outline: none; outline-offset: 0.1rem; cursor: pointer; transition: color 0.25s ease 0s;">$ riscv64-unknown-elf-gdb benos_payload.elf // 开始调试(gdb) target remote 127.0.0.1:1025 // 连接调试服务软件(gdb) load // 加载benos_payload.elf(gdb) x /x 0x20000 // 检查0x20000是否被正确写入,// 我们调试程序时可能因为上次的死机导致无法load// 这时可以让板子进入烧录模式,再重新连接、重新加载(gdb) b sbi_main // 设置断点为sbi_main函数(gdb) c // 执行(gdb) n // 下一步(gdb) b sbi_main.c:102 // 设置断点为sbi_main.c的102行(gdb) info b // 查看所有断点(gdb) i b // 查看所有断点,简写的命令(gdb) c // 继续执行(gdb) si // 单步执行并进入函数,每次执行一条汇编语句(gdb) symbol-file benos.elf // 读取benos.elf的符号表,否则你调试时无法知道函数、代码等信息(gdb) si // 单步执行并进入函数,每次执行一条汇编语句(gdb) b kernel_main // 设置断点为kernel_main函数(gdb) c // 继续执行(gdb) i r // 列出所有寄存器的值(gdb) l // 列出代码(gdb) l(gdb) c // 继续执行Program received signal SIGINT, Interrupt. // 按Ctrl+C停止程序(gdb) quit // 退出调试[color=rgba(0, 0, 0, 0.87)]benos_payload.elf 是 2 个程序的组合,调试的要点在于: [color=rgba(0, 0, 0, 0.87)]① 调试第 1 个程序时,默认从 benos_payload.elf 里得到符号表 [color=rgba(0, 0, 0, 0.87)]② 执行到第 2 个程序时,需要使用 symbol-file benos.elf 命令读取 benos.elf 的符号表,否则你调试时无法知道函数、代码等信息。 [color=rgba(0, 0, 0, 0.87)]③ 怎么知道执行到了第 2 个程序?可以在 sbi_main.c 里如下红框代码处设置断点(比如 b sbi_main.c:102 ),执行到断点后,再执行 si 命令就开始运行第 2 个程序了: [color=rgba(0, 0, 0, 0.87)] [color=var(--md-typeset-a-color)]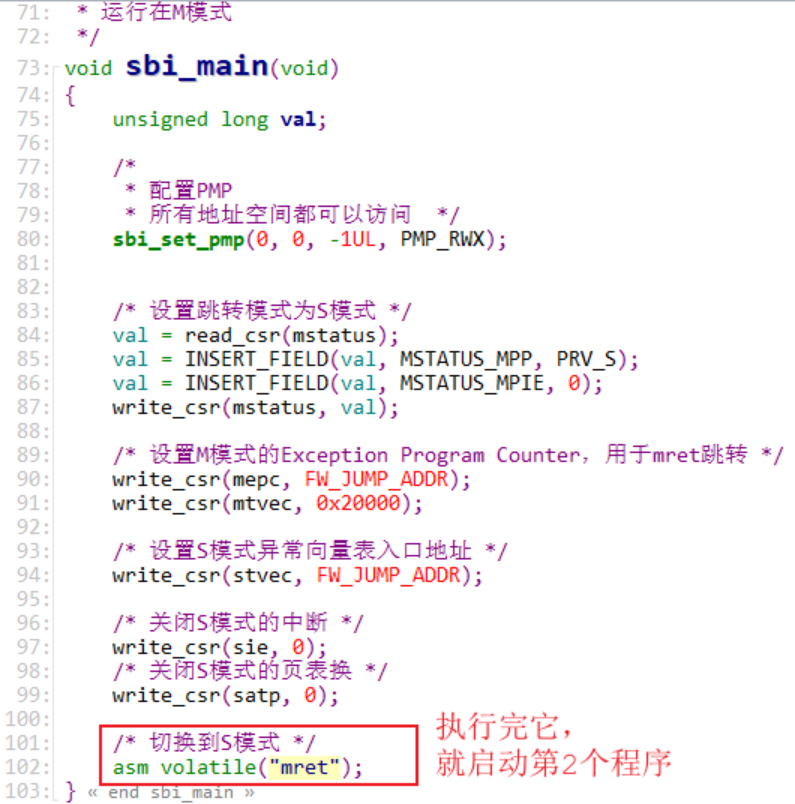 [color=rgba(0, 0, 0, 0.87)]当 T-HeadDebugServer 识别出芯片后,就可以在 Powershell 里执行 riscv64-unknown-elf-gdb -tui benos_payload.elf 来调试程序了。 [color=rgba(0, 0, 0, 0.87)]注意:在 Git Bash 中无法使用 TUI 功能,需要使用 Powershell 。 [color=rgba(0, 0, 0, 0.87)]先启动 Powershell :进入源码目录后,按住 shift 键同时点击鼠标右键,在弹出的菜单里启动 Powershell ,如下图所示: [color=rgba(0, 0, 0, 0.87)] [color=var(--md-typeset-a-color)]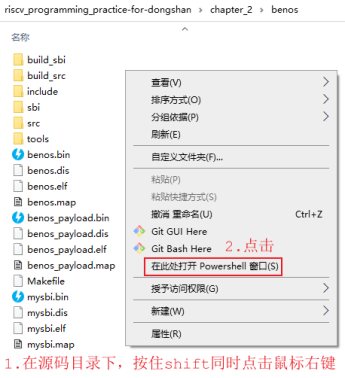 [color=rgba(0, 0, 0, 0.87)]在 Powershell 窗口,执行如下命令即可开始调试: code" style="box-sizing: inherit; -webkit-tap-highlight-color: transparent; font-size: inherit; font-family: inherit; background-image: initial; background-position: initial; background-size: initial; background-repeat: initial; background-attachment: initial; background-origin: initial; background-clip: initial; border-width: 0px; border-style: initial; border-color: initial; position: absolute; top: 0.5em; right: 0.5em; z-index: 1; width: 1.5em; height: 1.5em; border-radius: 0.1rem; outline: none; outline-offset: 0.1rem; cursor: pointer; transition: color 0.25s ease 0s;">riscv64-unknown-elf-gdb -tui benos_payload.elf[color=rgba(0, 0, 0, 0.87)]执行上述命令后,可以得到如下界面(源码窗口里的汉字是乱码,暂时无法解决): [color=rgba(0, 0, 0, 0.87)] [color=var(--md-typeset-a-color)]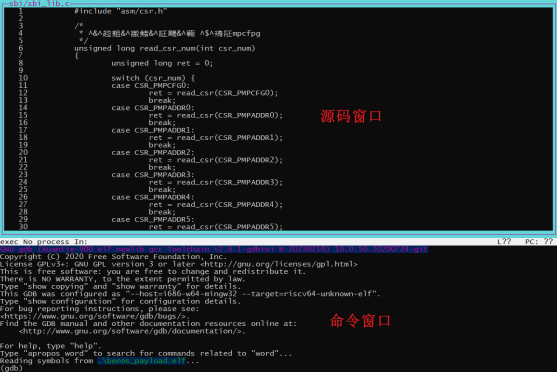 [color=rgba(0, 0, 0, 0.87)]使用 TUI 的便利在于可以方便地观看源码、反汇编码、寄存器,显示这些信息的窗口被称为 layout 。使用以下命令可以显示这些 layout : [color=rgba(0, 0, 0, 0.87)]① layout src:显示源码窗口 [color=rgba(0, 0, 0, 0.87)]② layout asm:显示汇编窗口 [color=rgba(0, 0, 0, 0.87)]③ layout regs:在之前的窗口上再显示寄存器窗口 [color=rgba(0, 0, 0, 0.87)]④ layout split:显示源码、汇编窗口 [color=rgba(0, 0, 0, 0.87)]⑤ layout next:显示下一个 layout [color=rgba(0, 0, 0, 0.87)]⑥ layout prev:显示上一个 layout [color=rgba(0, 0, 0, 0.87)]能输入各类 GDB 命令的窗口是 命令窗口 ,它总是显示的。 [color=rgba(0, 0, 0, 0.87)]要同时显示源码和寄存器,可以执行如下 2 个命令: code" style="box-sizing: inherit; -webkit-tap-highlight-color: transparent; font-size: inherit; font-family: inherit; background-image: initial; background-position: initial; background-size: initial; background-repeat: initial; background-attachment: initial; background-origin: initial; background-clip: initial; border-width: 0px; border-style: initial; border-color: initial; position: absolute; top: 0.5em; right: 0.5em; z-index: 1; width: 1.5em; height: 1.5em; border-radius: 0.1rem; outline: none; outline-offset: 0.1rem; cursor: pointer; transition: color 0.25s ease 0s;">layout srclayout regs[color=rgba(0, 0, 0, 0.87)]要同时显示反汇编码和寄存器,可以执行如下 2 个命令: code" style="box-sizing: inherit; -webkit-tap-highlight-color: transparent; font-size: inherit; font-family: inherit; background-image: initial; background-position: initial; background-size: initial; background-repeat: initial; background-attachment: initial; background-origin: initial; background-clip: initial; border-width: 0px; border-style: initial; border-color: initial; position: absolute; top: 0.5em; right: 0.5em; z-index: 1; width: 1.5em; height: 1.5em; border-radius: 0.1rem; outline: none; outline-offset: 0.1rem; cursor: pointer; transition: color 0.25s ease 0s;">layout asmlayout regs[color=rgba(0, 0, 0, 0.87)]要同时显示源码和反汇编码,可以执行如下命令: code" style="box-sizing: inherit; -webkit-tap-highlight-color: transparent; font-size: inherit; font-family: inherit; background-image: initial; background-position: initial; background-size: initial; background-repeat: initial; background-attachment: initial; background-origin: initial; background-clip: initial; border-width: 0px; border-style: initial; border-color: initial; position: absolute; top: 0.5em; right: 0.5em; z-index: 1; width: 1.5em; height: 1.5em; border-radius: 0.1rem; outline: none; outline-offset: 0.1rem; cursor: pointer; transition: color 0.25s ease 0s;">layout split[color=rgba(0, 0, 0, 0.87)]使用 TUI 模式时,只是方便我们观看源码、反汇编码、寄存器,具体操作还是在命令窗口输入 GDB 命令,请参考《2.2.4 命令行调试示例》。 2.2.6 gdb脚本[color=rgba(0, 0, 0, 0.87)]如果不想每次执行 riscv64-unknown-elf-gdb benos_payload.elf 或 riscv64-unknown-elf-gdb -tui benos_payload.elf 后,都手工执行以下命令来连接调试服务软件: code" style="box-sizing: inherit; -webkit-tap-highlight-color: transparent; font-size: inherit; font-family: inherit; background-image: initial; background-position: initial; background-size: initial; background-repeat: initial; background-attachment: initial; background-origin: initial; background-clip: initial; border-width: 0px; border-style: initial; border-color: initial; position: absolute; top: 0.5em; right: 0.5em; z-index: 1; width: 1.5em; height: 1.5em; border-radius: 0.1rem; outline: none; outline-offset: 0.1rem; cursor: pointer; transition: color 0.25s ease 0s;">(gdb) target remote 127.0.0.1:1025 // 连接调试服务软件[color=rgba(0, 0, 0, 0.87)]可以把这些命令写入一个名为 .gdbinit 的文件里,注意这个文件名的第 1 个字符是 . ,它表示在 Linux 系统下它是一个隐藏文件。在 Windows 的文件浏览器里我们可以看见它,但是在 Git Bash 里执行 ls 命令看不到它,需要执行 ls -a 命令才能看见。 [color=rgba(0, 0, 0, 0.87)]你可以在 .gdbinit 里放入更多命令,下面是一个例子: code" style="box-sizing: inherit; -webkit-tap-highlight-color: transparent; font-size: inherit; font-family: inherit; background-image: initial; background-position: initial; background-size: initial; background-repeat: initial; background-attachment: initial; background-origin: initial; background-clip: initial; border-width: 0px; border-style: initial; border-color: initial; position: absolute; top: 0.5em; right: 0.5em; z-index: 1; width: 1.5em; height: 1.5em; border-radius: 0.1rem; outline: none; outline-offset: 0.1rem; cursor: pointer; transition: color 0.25s ease 0s;">target remote 127.0.0.1:1025loadb sbi_main.c:102
|