本帖最后由 freeelectron 于 2022-3-18 11:02 编辑
1、准备好一个keil 工程
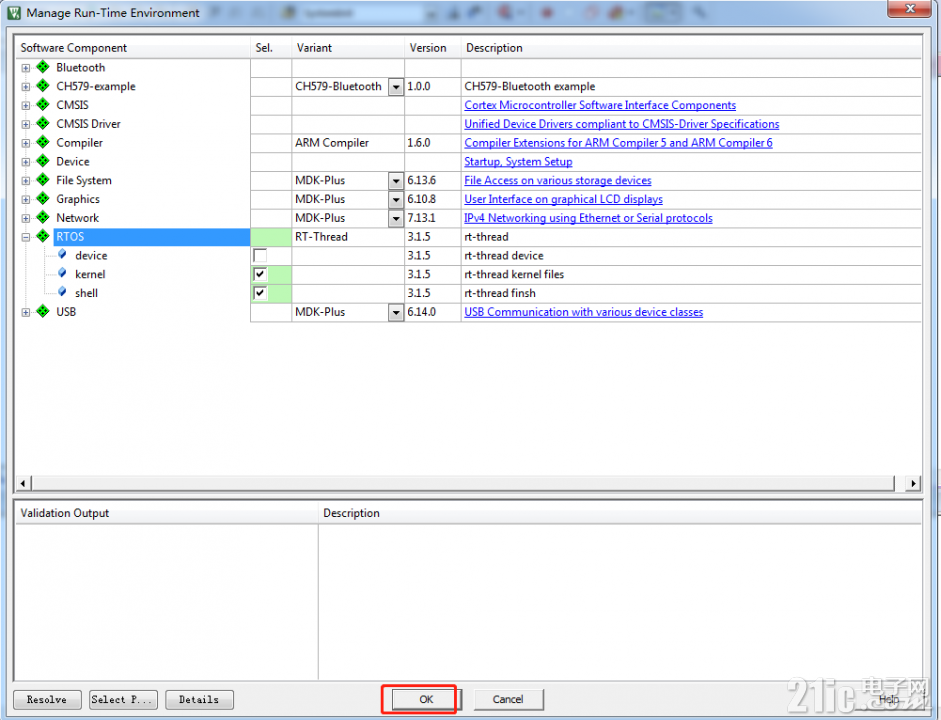
2、点击“Manage Run-Time Environment”

3、在“Manage Run-Time Environment”中勾选kernel和shell
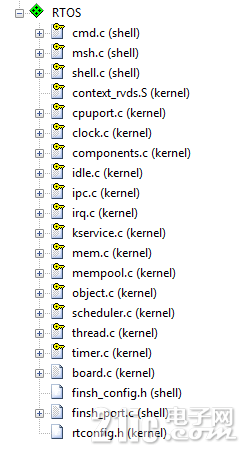
4、勾选之后,在工程目录中,可以看到多了RTOS一项,里面是RT-Thread的相关代码
5、FinSH配置,在rtconfig.h中使能FinSH,可以使用配置向导,也可以使用代码

6、控制台使能,在rtconfig.h中使能控制台,可以使用配置向导,也可以使用代码

7、”系统时钟节拍配置报错,#error "TODO 1: OS Tick Configuration."

8、配置系统时钟节拍
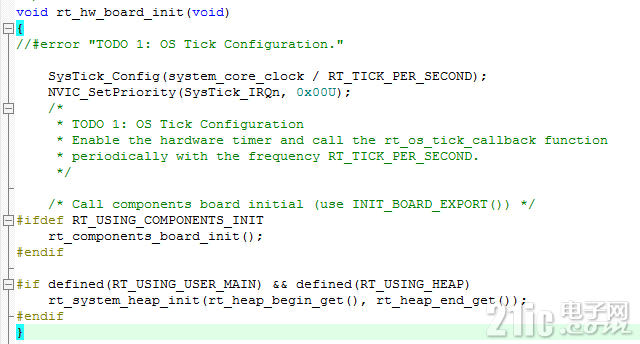
在void rt_hw_board_init(void)函数中,设置使用systick为系统时钟。
9、串口初始化报错,“"TODO 2: Enable the hardware uart and config baudrate."”

10、配置串口

在uart_init函数中,调用串口初始化的函数即可。
- void SerialInit(void)
- {
- gpio_init_type gpio_init_struct;
- crm_periph_clock_enable(CRM_USART1_PERIPH_CLOCK, TRUE);
- #if 1
- /* enable the usart1 and gpio clock */
- crm_periph_clock_enable(CRM_GPIOB_PERIPH_CLOCK, TRUE);
- gpio_default_para_init(&gpio_init_struct);
- /* configure the usart1 tx/rx pin */
- gpio_init_struct.gpio_drive_strength = GPIO_DRIVE_STRENGTH_STRONGER;
- gpio_init_struct.gpio_out_type = GPIO_OUTPUT_PUSH_PULL;
- gpio_init_struct.gpio_mode = GPIO_MODE_MUX;
- gpio_init_struct.gpio_pins = GPIO_PINS_6 | GPIO_PINS_7;
- gpio_init_struct.gpio_pull = GPIO_PULL_NONE;
- gpio_init(GPIOB, &gpio_init_struct);
-
- /* config usart1 iomux */
- gpio_pin_mux_config(GPIOB, GPIO_PINS_SOURCE6, GPIO_MUX_0);
- gpio_pin_mux_config(GPIOB, GPIO_PINS_SOURCE7, GPIO_MUX_0);
- #else
- /* enable the usart1 and gpio clock */
- crm_periph_clock_enable(CRM_GPIOA_PERIPH_CLOCK, TRUE);
- gpio_default_para_init(&gpio_init_struct);
- /* configure the usart1 tx/rx pin */
- gpio_init_struct.gpio_drive_strength = GPIO_DRIVE_STRENGTH_STRONGER;
- gpio_init_struct.gpio_out_type = GPIO_OUTPUT_PUSH_PULL;
- gpio_init_struct.gpio_mode = GPIO_MODE_MUX;
- gpio_init_struct.gpio_pins = GPIO_PINS_9 ;
- gpio_init_struct.gpio_pull = GPIO_PULL_NONE;
- gpio_init(GPIOA, &gpio_init_struct);
-
- gpio_init_struct.gpio_pins = GPIO_PINS_10;
- gpio_init(GPIOA, &gpio_init_struct);
-
- /* config usart1 iomux */
- gpio_pin_mux_config(GPIOA, GPIO_PINS_SOURCE9, GPIO_MUX_1);
- gpio_pin_mux_config(GPIOA, GPIO_PINS_SOURCE10, GPIO_MUX_1);
- #endif
- /* configure usart1 param */
- usart_init(USART1, 115200, USART_DATA_8BITS, USART_STOP_1_BIT);
- usart_parity_selection_config(USART1, USART_PARITY_NONE);
- usart_hardware_flow_control_set(USART1,USART_HARDWARE_FLOW_NONE);
- usart_transmitter_enable(USART1, TRUE);
- usart_receiver_enable(USART1, TRUE);
- usart_enable(USART1, TRUE);
- }
11、串口输出报错,“"TODO 3: Output the string 'str' through the uart."”

12、配置串口输出
- void rt_hw_console_output(const char *str)
- {
- //#error "TODO 3: Output the string 'str' through the uart."
-
- rt_size_t i = 0, size = 0;
- char a = '\r';
-
- size = rt_strlen(str);
- for (i = 0; i < size; i++)
- {
- if (*(str + i) == '\n')
- {
- usart_data_transmit(USART1, (uint32_t )a);
- while((usart_flag_get(USART1, USART_TDC_FLAG) == RESET));
- }
- usart_data_transmit(USART1, (uint32_t)*(str + i));
- while((usart_flag_get(USART1, USART_TDC_FLAG) == RESET));
- }
- }
13、串口输入报错,“#error "TODO 4: Read a char from the uart and assign it to 'ch'."”

14、配置串口输入
- RT_WEAK char rt_hw_console_getchar(void)
- {
- /* Note: the initial value of ch must < 0 */
- //#error "TODO 4: Read a char from the uart and assign it to 'ch'."
- /* the initial value of ch must < 0 */
- int ch = -1;
- if (usart_flag_get(USART1, USART_RDBF_FLAG) != RESET)
- {
- ch = usart_data_receive(USART1);
- }
- else
- {
- rt_thread_mdelay(10);
- }
- return ch;
- }
15、HardFault_Handler和PendSV_Handler重复定义

在at32f425_int.c中屏蔽掉即可,这两个中断RT-Thread已经处理了。
16、Systick中断回调处理
配置了Systick为系统的时钟,需要需要在Systick中处理系统的回调函数
- void SysTick_Handler(void)
- {
- void rt_os_tick_callback(void);
- rt_os_tick_callback();
- }
17、创建一个led线程
- static rt_thread_t led_thread = RT_NULL;
- void LedInit(void)
- {
- gpio_init_type gpio_init_struct;
- /* enable the led clock */
- crm_periph_clock_enable(CRM_GPIOC_PERIPH_CLOCK, TRUE);
- /* set default parameter */
- gpio_default_para_init(&gpio_init_struct);
- /* configure the led gpio */
- gpio_init_struct.gpio_drive_strength = GPIO_DRIVE_STRENGTH_STRONGER;
- gpio_init_struct.gpio_out_type = GPIO_OUTPUT_PUSH_PULL;
- gpio_init_struct.gpio_mode = GPIO_MODE_OUTPUT;
- gpio_init_struct.gpio_pins = GPIO_PINS_2|GPIO_PINS_3|GPIO_PINS_5;
- gpio_init_struct.gpio_pull = GPIO_PULL_NONE;
- gpio_init(GPIOC, &gpio_init_struct);
- }
- static void led_thread_entry(void *parameter)
- {
- while (1)
- {
- gpio_bits_write(GPIOC, GPIO_PINS_2|GPIO_PINS_3|GPIO_PINS_5, (confirm_state)!gpio_output_data_bit_read(GPIOC, GPIO_PINS_2|GPIO_PINS_3|GPIO_PINS_5));
- rt_thread_mdelay(1000);
- rt_kprintf("led blink\r\n");
- }
- }
- void LedThreadStart(void)
- {
- led_thread = rt_thread_create( "led", /*线程名字*/
- led_thread_entry,/*线程入口函数*/
- RT_NULL,/*线程入口函数参数*/
- 256, /*线程栈大小*/
- 4 , /*线程优先级*/
- 20); /*线程时间片*/
- rt_thread_startup (led_thread);
- }
18、硬件初始化
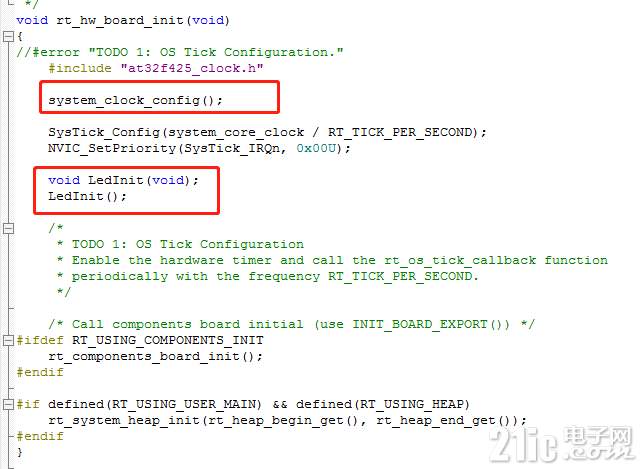
在rt_hw_board_init函数中包含led初始化函数。
19、在main函数中调用启动led线程
- int main(void)
- {
- LedThreadStart();
- return 0;
- }
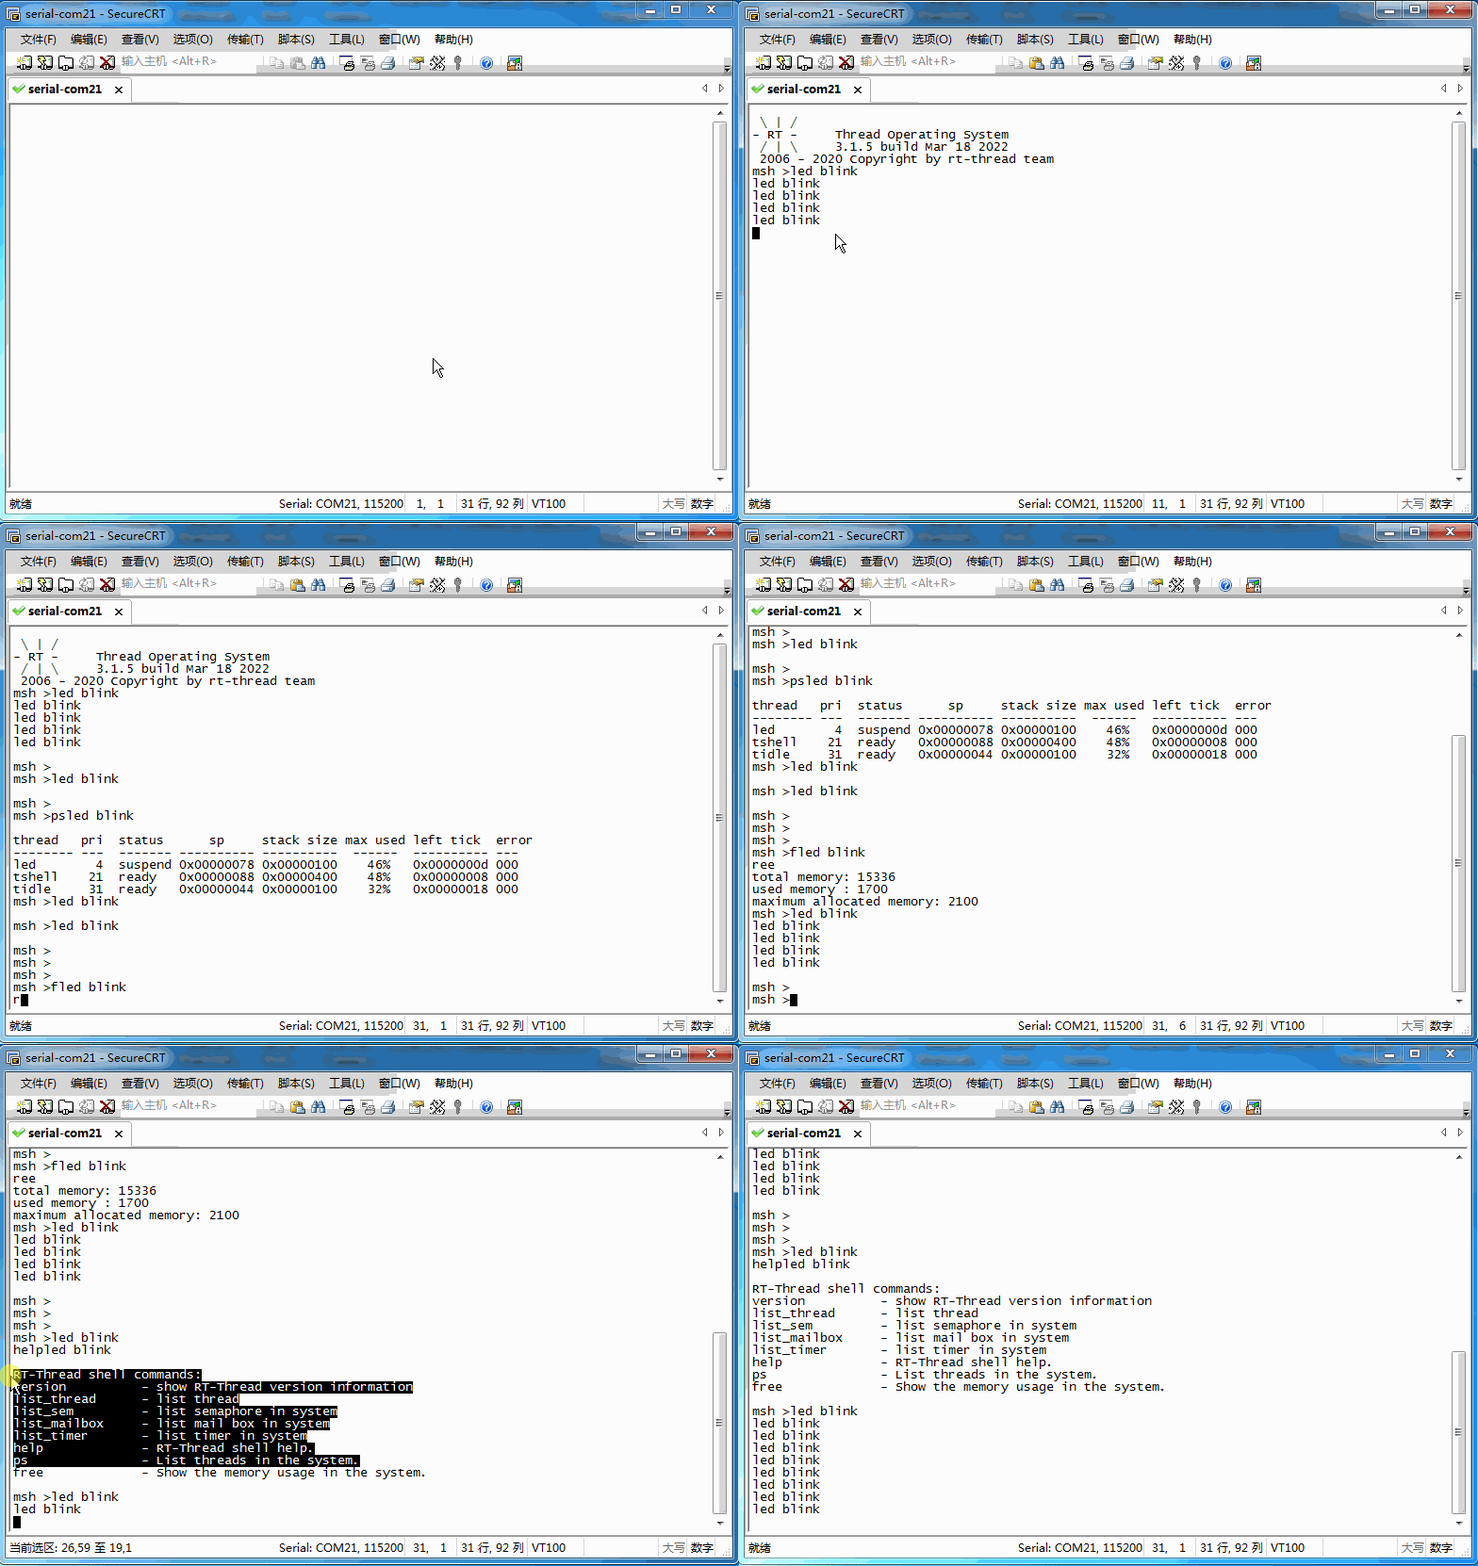
20、现象
|