- if (tx_byte_allocate(byte_pool, (VOID **) &pointer, 1024, TX_NO_WAIT) != TX_SUCCESS)
- {
- return TX_POOL_ERROR;
- }
- /* Create the usbx_cdc_acm_write_thread_entry thread */
- if (tx_thread_create(&my_cdc_thread, "my_cdc_thread_entry",
- my_cdc_thread_entry, 1, pointer,
- 1024, 20, 20, TX_NO_TIME_SLICE,
- TX_AUTO_START) != TX_SUCCESS)
- {
- return TX_THREAD_ERROR;
- }
my_cdc_thread_entry线程函数主要完成
ADC校准、在CDC就绪的情况启动ADC中断采集方式、通过tx_event_flags_get函数获得采集完成标志、去读ADC数据明文、通过encrypt_ADC_data加密、通过UART_SendU32_BigEndian()函数经USB CDC发送给PC机
- VOID my_cdc_thread_entry(ULONG thread_input)
- {
- UX_SLAVE_DEVICE *device;
- ULONG senddataflag = 0;
- UX_PARAMETER_NOT_USED(thread_input);
- device = &_ux_system_slave->ux_system_slave_device;
- /* Perform ADC calibration */
- if (HAL_ADCEx_Calibration_Start(&hadc1, ADC_SINGLE_ENDED) != HAL_OK)
- {
- /* Calibration Error */
- Error_Handler();
- }
- while (1)
- {
- /* Check if device is configured */
- /* Wait until the requested flag TX_NEW_TRANSMITTED_DATA is received */
- if ((device->ux_slave_device_state == UX_DEVICE_CONFIGURED) && (cdc_acm != UX_NULL))
- {
-
- /* Start ADC group regular conversion */
- if (HAL_ADC_Start_IT(&hadc1) != HAL_OK)
- {
- /* Error: ADC conversion start could not be performed */
- Error_Handler();
- }
-
- if (tx_event_flags_get(&EventFlag, TX_ADC_CPLT_DATA, TX_OR_CLEAR,
- &senddataflag, TX_WAIT_FOREVER) != TX_SUCCESS)
- {
- Error_Handler();
- }
-
- Plaintext[0]=uhADCxConvertedData;
- Plaintext[1]=uhADCxConvertedData_Voltage_mVolt;
- Plaintext[2]=uhADCxConvertedData;
- Plaintext[3]=uhADCxConvertedData_Voltage_mVolt;
-
- encrypt_ADC_data();
-
- UART_SendU32_BigEndian(EncryptedText, 4);
- }
-
- tx_thread_sleep(MS_TO_TICK(1000));
- }
- }
二、ADC配置


ADC回调处理:
获取ADC数据(0-4096),转换为mV(0-3300),通过tx_event_flags_set设置ADC完成标志
- void HAL_ADC_ConvCpltCallback(ADC_HandleTypeDef *hadc)
- {
- /* Retrieve ADC conversion data */
- uhADCxConvertedData = HAL_ADC_GetValue(hadc);
- /* Computation of ADC conversions raw data to physical values */
- /* using helper macro. */
- uhADCxConvertedData_Voltage_mVolt = __LL_ADC_CALC_DATA_TO_VOLTAGE(VDDA_APPLI, uhADCxConvertedData, LL_ADC_RESOLUTION_12B);
- /* Update status variable of ADC unitary conversion */
- ubAdcGrpRegularUnitaryConvStatus = 1;
-
- if (tx_event_flags_set(&EventFlag, TX_ADC_CPLT_DATA, TX_OR) != TX_SUCCESS)
- {
- Error_Handler();
- }
- }
三、AES配置

加密方式:ECB(电子密码本)
密钥:__ALIGN_BEGIN static const uint32_t pKeyAES[4] __ALIGN_END = {
0x01020304,0x05060708,0x090A0B0C,0x0D0E0F10};
加密函数:
Plaintext是明文,EncryptedText是密文
- void encrypt_ADC_data()
- {
- if (HAL_CRYP_Encrypt(&hcryp, Plaintext, PLAINTEXT_SIZE, EncryptedText, TIMEOUT_VALUE) != HAL_OK)
- {
- /* Processing Error */
- Error_Handler();
- }
-
- }
为了CDC输出格式满足要求,编写UART_SendU32_BigEndian函数,负责格式转换和CDC输出
- void UART_SendU32_BigEndian( uint32_t *data, uint16_t word_count) {
- ULONG actual_length;
- for (uint16_t i = 0; i < word_count; i++) {
- uint8_t bytes[4];
- bytes[0] = (data[i] >> 24) & 0xFF; // 最高字节
- bytes[1] = (data[i] >> 16) & 0xFF;
- bytes[2] = (data[i] >> 8) & 0xFF;
- bytes[3] = data[i] & 0xFF; // 最低字节
-
-
- ux_device_class_cdc_acm_write(cdc_acm, (UCHAR *)&bytes,4, &actual_length);
- }
- }
四、用PYTHON编写一个PC机处理函数
主要是处理串口接收,然后解密打印到终端
- import serial
- from Cryptodome.Cipher import AES
- from Cryptodome.Util.Padding import pad, unpad
- import struct
- # AES 密钥(必须16/24/32字节)
- AES_KEY = b'\x01\x02\x03\x04\x05\x06\x07\x08\x09\x0A\x0B\x0C\x0D\x0E\x0F\x10' # AES-128 (16字节)
- def setup_serial(port, baudrate=115200):
- """初始化串口"""
- try:
- ser = serial.Serial(port, baudrate, timeout=1)
- print(f"串口 {port} 已打开,波特率 {baudrate}")
- return ser
- except Exception as e:
- print(f"无法打开串口 {port}: {e}")
- return None
- def decrypt_aes_ecb(ciphertext, key):
- """AES-ECB 解密"""
- cipher = AES.new(key, AES.MODE_ECB)
- decrypted = cipher.decrypt(ciphertext)
- return decrypted
- #return unpad(decrypted, AES.block_size) # 自动去除填充
- def main():
- ser = setup_serial('COM45', 115200) # 修改为你的串口号(如 /dev/ttyUSB0)
- if not ser:
- return
- try:
- while True:
- if ser.in_waiting >= 16: # 至少16字节(AES块大小)
- ciphertext = ser.read(16) # 读取16字节加密数据
- print(f"\r\n接收加密数据: {ciphertext.hex()}")
- # AES-ECB 解密
- try:
- plaintext = decrypt_aes_ecb(ciphertext, AES_KEY)
- print("解密数据 (HEX):", plaintext.hex()) # 输出 HEX 格式
- print("解密数据 (Bytes):", plaintext) # 直接输出字节
- uint32_value = struct.unpack('>L', plaintext[4:8])[0] # '<L' 表示小端uint32
- print("转换为uint32:", uint32_value,"mA", hex(uint32_value))
- except Exception as e:
- print(f"解密失败: {e}")
- except KeyboardInterrupt:
- print("\n程序终止")
- finally:
- ser.close()
- if __name__ == "__main__":
- main()
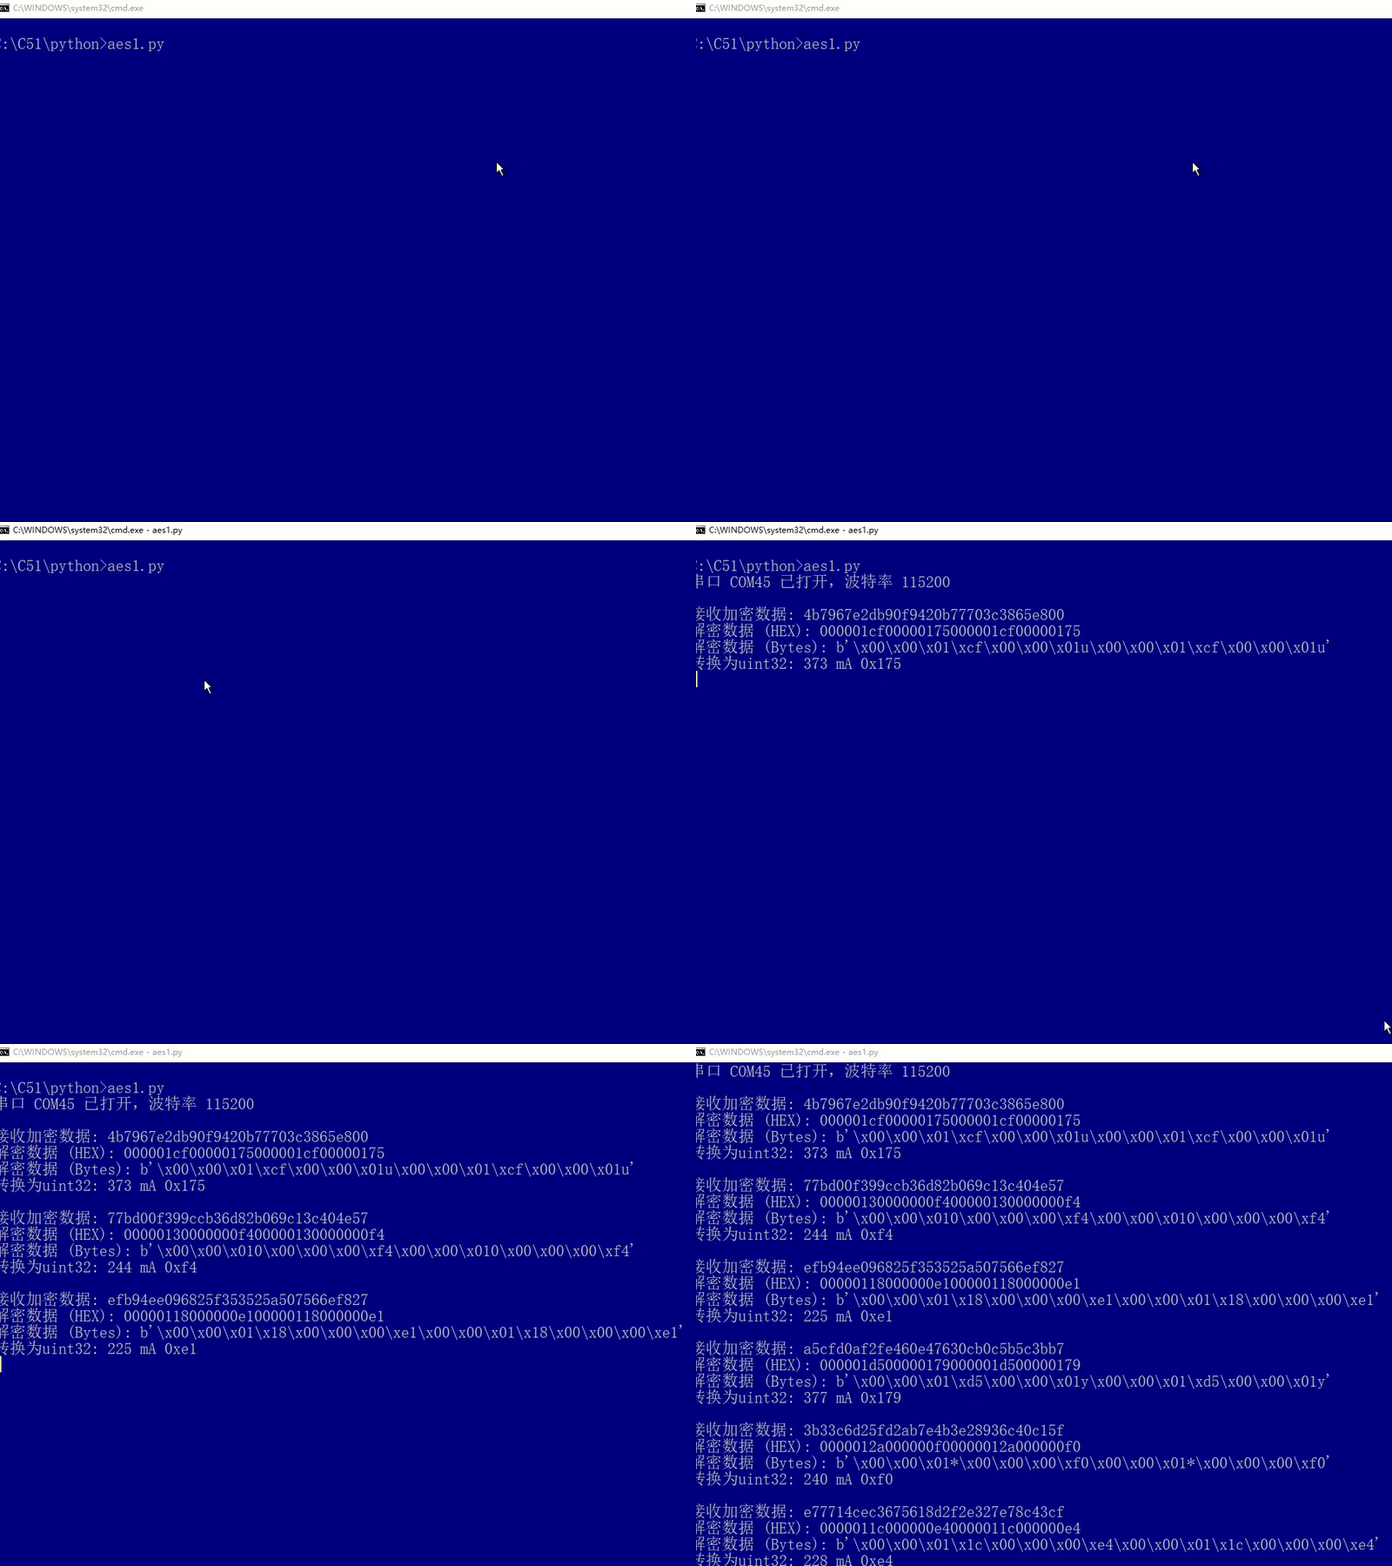
五、运行

发送了4个uint32_t,第一、三是ADC的采集数据(0-4096),第二、四是电压mV(上面笔误写的mA)