本帖最后由 susutata 于 2024-4-23 18:55 编辑
#申请原创# @21小跑堂
Mbed OS 的 USB Driver 应用
## 前言
本贴主要内容为 MbedOS 的 USB Driver 使用方法,及其 USB Device Stack 和 USB Component 介绍。
## 01 USB Device Stack
Mbed OS 的 USB Driver 包含三个部分:USB PHY、USB Device Stack 和 USB Component。USB PHY 是 USB 物理层,USB Device Stack 是 USB 设备堆栈,USB Component 是 USB 组件。
这里将 Mbed OS USB Driver 和 APM32 的 USB Driver、USB Library 进行一个粗略的对比,以便大家更好地理解 Mbed OS 的 USB Driver。
USB PHY 部分相当于 APM32 USB Driver 的 USBD Hardware Init 和 USBD Config 部分,USB Device Stack 部分相当于 APM32 USB Driver 的 USBD Core 部分,USB Component 部分相当于 APM32 USB Driver 的 USBD Class 部分。
下面是 Mbed OS 的官方文档中关于这三个部分的介绍:
> USBPhy provides raw access to USB in the role of a USB Device. > USBDevice is the core of Mbed OS's USB stack and is responsible for state management and synchronization. > USB component is code that inherits from USBDevice and provides the desired USB interfaces.
在官方文档的 USB PHY 、USB Device Stack 和 USB Component 的交互图中,我们可以看到很多熟悉的 API 名字。比如: - connect()
- disconnect()
- configure()
- set_address()
- sof_enable()
- remote_wakeup()
- endpoint_stall()
- endpoint_unstall()

在这些交互 API 中,USB Component 会有一些回调函数用于获取 USB 设备的状态的 API:
- callback_state_change()
 响应 USB 主机的请求的 API:
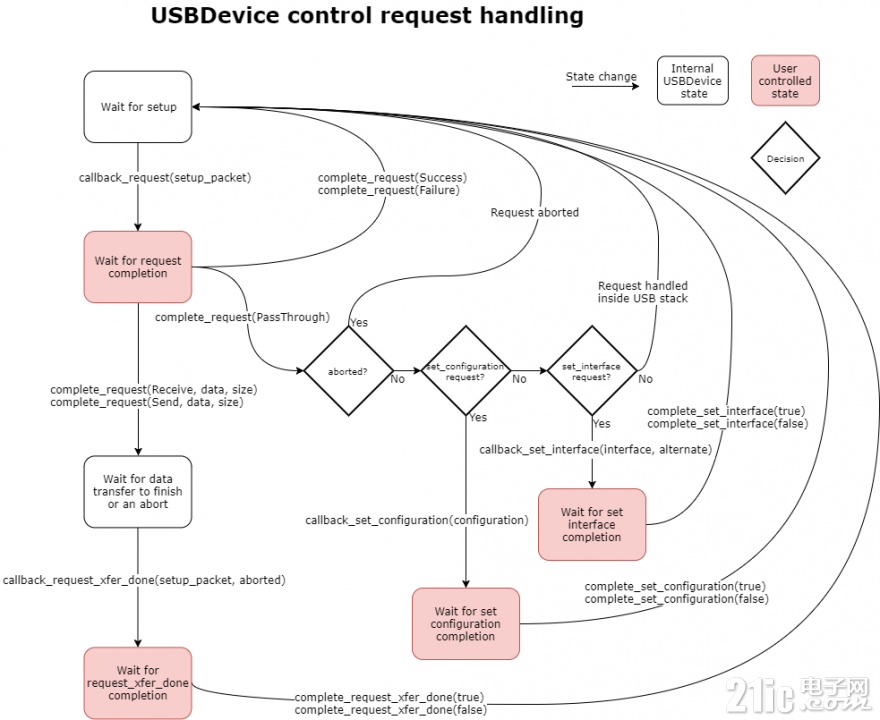
- callback_request()- callback_request_xfer_done()- callback_set_configuration()- callback_set_interface()
下图是官方文档中的控制请求状态机。

以及 IN/OUT 数据传输的 API: callback_out() callback_in()
下图是官方文档的 IN/OUT 数据传输状态机。
另外,还有一些端点的配置 API: - EndpointResolver resolver(endpoint_table());
- resolver.endpoint_ctrl(CDC_MAX_PACKET_SIZE);
- bulk_in = resolver.endpoint_in(USB_EP_TYPE_BULK, CDC_MAX_PACKET_SIZE);
- bulk_out = resolver.endpoint_out(USB_EP_TYPE_BULK, CDC_MAX_PACKET_SIZE);
- int_in = resolver.endpoint_in(USB_EP_TYPE_INT, CDC_MAX_PACKET_SIZE);
## 02 USB Component Mbed OS 的 USB Component 包含以下的一系列 USB 设备类/组件:
- USB Audio
- USB CDC
- USB CDC ECM
- USB HID
- USB Keyboard
- USB Mouse
- USB MIDI
- USB MouseKeyboard
- USB MSD
- USB Serial
这些 Class 或 Component 的实现方式都差不多,都是继承自 USBDevice 类,然后实现自己的功能。以下内容以 USB CDC 为例,简单介绍一下 USB CDC 的实现及使用。
### USBCDC 构造函数 USBCDC 有两个构造函数,用户可以根据自己的需求选择不同的初始化方式。
#### 构造函数一 该构造函数可以利用 `connect_blocking` 参数来选择是否在创建对象时就立即连接并等待设备就绪。
- USBCDC::USBCDC(bool connect_blocking, uint16_t vendor_id, uint16_t product_id, uint16_t product_release)
- : USBDevice(get_usb_phy(), vendor_id, product_id, product_release)
- {
- _init();
- if (connect_blocking) {
- connect();
- wait_ready();
- } else {
- init();
- }
- }
#### 构造函数二 该构造函数可以利用 `USBPhy` 参数来选择用户自己的 USB PHY 进行初始化。 - USBCDC::USBCDC(USBPhy *phy, uint16_t vendor_id, uint16_t product_id, uint16_t product_release)
- : USBDevice(phy, vendor_id, product_id, product_release)
- {
- _init();
- }
### USBCDC 初始化函数 从 USBCDC 的初始化函数中可以看到,USB CDC 配置了三个端点,分别是 `bulk_in`、`bulk_out` 和 `int_in`。其中 `bulk_in` 和 `bulk_out` 是 BULK 类型的端点,`int_in` 是 INT 类型的端点。这一点和 APM32 的 USB CDC 类似,都是符合 USB CDC Class 的规范。 - void USBCDC::_init()
- {
- memcpy(_cdc_line_coding, cdc_line_coding_default, sizeof(_cdc_line_coding));
- EndpointResolver resolver(endpoint_table());
- resolver.endpoint_ctrl(CDC_MAX_PACKET_SIZE);
- _bulk_in = resolver.endpoint_in(USB_EP_TYPE_BULK, CDC_MAX_PACKET_SIZE);
- _bulk_out = resolver.endpoint_out(USB_EP_TYPE_BULK, CDC_MAX_PACKET_SIZE);
- _int_in = resolver.endpoint_in(USB_EP_TYPE_INT, CDC_MAX_PACKET_SIZE);
- ...
- }
### USBCDC 的请求处理函数 USBCDC 的请求处理函数主要是处理 USB 主机发来的请求。这里主要是处理 USB CDC Class 的请求。这些请求主要是 CDC Class 的请求,比如设置波特率、数据位、停止位、奇偶校验位等。这里就不详细展开了。 - void USBCDC::callback_request(const setup_packet_t *setup);
- void USBCDC::callback_request_xfer_done(const setup_packet_t *setup, bool aborted);
- void USBCDC::callback_set_configuration(uint8_t configuration);
- void USBCDC::callback_set_interface(uint16_t interface, uint8_t alternate);
### USBCDC 的数据传输函数 USBCDC 的数据传输函数主要是处理 USB 主机发来的数据, 以及向 USB 主机发送数据。还有一些中断回调函数。 - bool USBCDC::send(uint8_t *buffer, uint32_t size);
- void USBCDC::send_nb(uint8_t *buffer, uint32_t size, uint32_t *actual, bool now);
- void USBCDC::_send_isr_start();
- void USBCDC::_send_isr();
- bool USBCDC::receive(uint8_t *buffer, uint32_t size, uint32_t *size_read);
- void USBCDC::receive_nb(uint8_t *buffer, uint32_t size, uint32_t *size_read);
- void USBCDC::_receive_isr_start();
- void USBCDC::_receive_isr();
### USBCDC 的描述符 USBCDC 的描述符主要是 USB 设备的描述符,包括设备描述符、接口描述符、配置描述符和字符串描述符。如果用户需要自定义描述符,可以修改这些定义,但要注意这些修改会应用到所有使用该 Mbed OS 库的设备上。 - const uint8_t *USBCDC::device_desc()
- const uint8_t *USBCDC::string_iinterface_desc()
- const uint8_t *USBCDC::string_iproduct_desc()
- const uint8_t *USBCDC::configuration_desc(uint8_t index)
## 03 USB Driver 前面几个章节主要介绍了 Mbed OS 的 USB Device Stack 和 USB Component,最后我们来看一下 Mbed OS 的 USB Driver 具体是如何使用的。
在正式开始之前,还需要配置一下 Mbed OS 的工程,将 `SLEEP` 功能关闭,因为 USB 设备通常需要持续运行以响应主机的请求,如果设备进入睡眠模式,可能会导致无法正常响应主机的请求,从而影响 USB 功能的正常工作。在 Mbed OS 工程中新建 `mbed_app.json` 文件,并添加以下内容: - {
- "target_overrides": {
- "*": {
- "target.device_has_remove": ["SLEEP"]
- }
- }
- }
### USB CDC
USB CDC 的使用非常简单,只需要创建一个 USBCDC 对象,然后调用 `send()` 函数发送数据即可。下面是一个简单的例子。
例子是使用第二种构造函数,并自定义了 Vendor ID 、Product ID 和 Product Release。如前面章节“USBCDC 构造函数”的介绍,使用第二种构造函数,在创建 USBCDC 对象时不会马上连接,可以在应用代码中自己控制连接的时机。这里我们在创建 USBCDC 对象后,调用 `connect()` 函数连接 USB 设备,然后调用 `wait_ready()` 函数等待 USB 设备就绪。
最后在主循环中,每隔 1s 发送一次数据。
- #include "mbed.h"
- #include "USBCDC.h"
- #include "usb_phy_api.h"
- #define MY_VID 0x314B
- #define MY_PID 0x1234
- #define MY_RELEASE 0x0001
- USBPhy *phy = get_usb_phy();
- USBCDC cdc(phy, MY_VID, MY_PID, MY_RELEASE);
- int main(void)
- {
- // Start the USB connect sequence
- cdc.connect();
- // Block until ready
- cdc.wait_ready();
- while (1) {
- char msg[] = "Hello world\r\n";
- cdc.send((uint8_t *)msg, strlen(msg));
- ThisThread::sleep_for(1s);
- }
- }

下载完成后,可以在设备管理器看到新的 USB 串行设备。

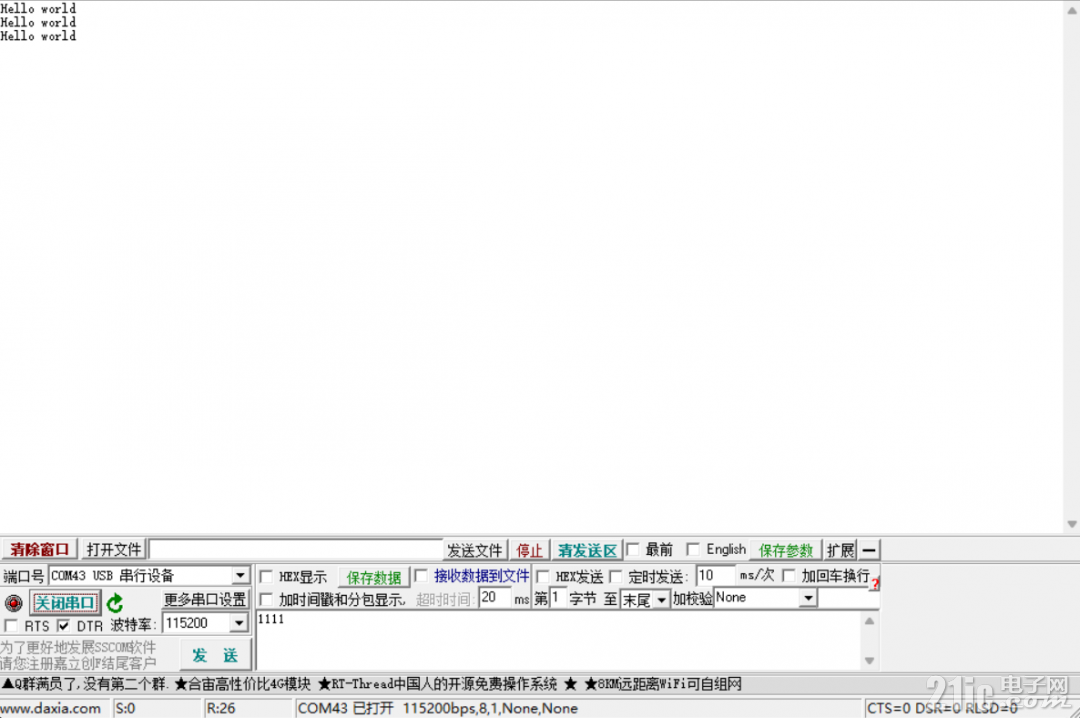
用串口工具连接后可以看到打印的数据。

### USB HID USB HID 的使用和 USB CDC 类似,创建一个 USBHID 对象,然后调用 `printf()` 函数发送数据即可。
例子中使用了第一种构造函数,创建 USBHID 对象时就连接并等待设备就绪。然后在主循环中,每隔 1s 打印一次数据。
- #include "mbed.h"
- #include "USBKeyboard.h"
- #include "usb_phy_api.h"
- #define MY_VID 0x314B
- #define MY_PID 0x1234
- #define MY_RELEASE 0x0001
- USBKeyboard key(true, MY_VID, MY_PID, MY_RELEASE);
- int main(void)
- {
- while (1) {
- key.printf("Hello World\r\n");
- ThisThread::sleep_for(1s);
- }
- }
用 Mbed Studio 编译和下载完成后,可以在设备管理器看到新的 USB Keyboard 设备。

打开记事本,可以看到每隔 1s 在光标后打印一次数据。

### USB MSD
USB MSD 的使用稍微复杂一点,它需要一个 BlockDevice 对象,用于存储数据。例子中使用了 HeapBlockDevice 对象,并在初始化时格式化了文件系统。然后创建一个 USBMSD 对象,将 BlockDevice 对象传入,然后调用 `connect()` 函数连接 USB 设备。 - #include "mbed.h"
- #include "USBMSD.h"
- #include "FATFileSystem.h"
- #include "usb_phy_api.h"
- #define MY_VID 0x314B
- #define MY_PID 0x1234
- #define MY_RELEASE 0x0001
- #define DEFAULT_BLOCK_SIZE 512
- #define HEAP_BLOCK_DEVICE_SIZE (128 * DEFAULT_BLOCK_SIZE)
- USBPhy *phy = get_usb_phy();
- FATFileSystem heap_fs("heap_fs");
- HeapBlockDevice bd(HEAP_BLOCK_DEVICE_SIZE, DEFAULT_BLOCK_SIZE);
- int main()
- {
- bd.init();
- FATFileSystem::format(&bd);
- int err = heap_fs.mount(&bd);
- if (err) {
- printf("%s filesystem mount failed\ntry to reformat device... \r\n", heap_fs.getName());
- err = heap_fs.reformat(&bd);
- }
- // If still error, then report failure
- if (err) {
- printf("Error: Unable to format/mount the device.\r\n");
- while (1);
- }
- USBMSD msd(&bd, phy, MY_VID, MY_PID, MY_RELEASE);
- // Start the USB connect sequence
- msd.connect();
- while (true) {
- msd.process();
- }
- return 0;
- }
用 Mbed Studio 编译和下载完成后,可以在设备管理器看到新的 USB MSD 设备。
打开文件管理器,可以看到新的 U 盘设备。
## 04 总结
至此,Mbed OS 的 USB 设备类/组件的使用方法已经介绍完毕。可以看到,Mbed OS 的 USB Driver 非常简单易用,但从目前接触的程度看,官方组件都是单个设备类的,如果需要复合设备类,还是需要自己实现的。
## 参考资料
https://bbs.21ic.com/icview-3369506-1-1.html
https://os.mbed.com/docs/mbed-os/v6.16/apis/usb-apis.html
附件是文章中使用的工程代码,该工程不包含Mbed OS库,该库需要到 Geehy Github 中下载。
|
